Welcome to the LnLP Forums and Resource Area

We have updated our forums to the latest version. If you had an account you should be able to log in and use it as before. If not please create an account and we look forward to having you as a member.

Fire Team - Red Eclipse AAR - The Encounter 2

Steve Overton

Member
Joined
Jan 15, 2015
Messages
368
Points
28
Location
Odessa, Texas
I'll post an AAR here on an encounter between similar sized infantry units. Still learning to get screen shots attached and embedded, so bare with me.

Local West Germans have reported that there is an armored vehicle near the middle of town but it seems to be 'broken'.

A US patrol is sent to investigate.

A Soviet patrol is sent to provide security.


Setup At Start.png


NOTE: All graphics shown in this AAR are playtest graphics and not production quality.
 
Last edited:

Steve Overton

Member
Joined
Jan 15, 2015
Messages
368
Points
28
Location
Odessa, Texas
The game turn is set on Turn 5. With the players rolling for Sudden Death on Turn 7 that will result in a game of no less than 3 turns.

Turn 1 Track.png


Under normal circumstances there would be between 1 and 4 objective locations on the map. Each player would then draw 3 value chits to see what the values of those locations are for that player. The players won't reveal the values they've drawn until the game is over.

Because there are normally 4 objectives and the players normally draw only 3 value chits you know that not all the objectives have a value to you or your opponent. It is possible that a single location has all 6 value chits drawn for it or there may be as many as 6 different location chits drawn. You never know for sure what the value of the locations are until at the end of the game. You can capture known locations for the value or capture them for a denial of what your opponent may get from them. Do whatever you think will help you win the game!!

In this case there are no physical objectives on the map. The vehicle is the objective. If the US Player destroys it he gets points for doing so. If not, then this game is determined by point value for infantry units eliminated. A draw will mean the Soviet player wins.
 
Last edited:

Steve Overton

Member
Joined
Jan 15, 2015
Messages
368
Points
28
Location
Odessa, Texas
The heart and soul of the KN system are the orders that leaders get and the number and size of their Command Points.

Each side gets 3 default orders. Because if all your leaders have been removed from play your forces can still do a minimal amount of operating. They won't simply shut down. However, a 3 order minimum is very close to being shut down. You need to be very careful the condition you keep your leaders in during play. A broken leader loses the ability to use his Leadership Rating and that loses that rating for the Command Point determination as well.

Here are the two sides determination for Command Points.

CP Chart US.png

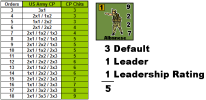
The US has 5 orders (3 by default, 1 for each Leader on the map, and 1 for each Leader Rating) you will find the number of orders that he can give in the left column. Find the 5 row and check the Command Point allocation. In this case the US Player will receive 1 One CP chit and 2 Two CP chits for a total of 3 chits in the CP draw pile.

CP Chart Sov.png

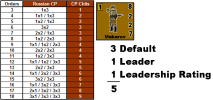
The Soviet has 5 orders as well. For exactly the same reasons the US Player does. When you check the Soviet allotment of Command Points though you find that the Soviet Player will only receive 1 Two and 1 Three CP chits for a total of 2 chits in the CP draw pile.

This difference is the factoring in of that military organizations training and tactical doctrine. There are no nationality traits taken into account for the Command Point allocation. Just whether a military organization is rigid or flexible in it's application of small unit leadership. Each military organization is taken into account separately. The US Army has one set of tactical doctrine the US Marine Corps another and their Command Point allocation is different. The same is normally true of multiple organizations in a nations military. Regular infantry force units train and have different tactics than their special force units and that is reflected in the Command Point allocations they receive to act and react during game play.

The OODA Loop is represented right here. Who can Observe, Orient, Decide and Act in what amounts of response. The more flexible a military organization the smaller the number of orders that can be given at once and the greater number of overall CP chits it will get to draw at random.
 

Steve Overton

Member
Joined
Jan 15, 2015
Messages
368
Points
28
Location
Odessa, Texas
During normal situations each side will get up to 4 Tactical Event Cards in their hand. The Tactical Event Cards are a blend of an organizations tactics and national tendencies. Each Tactical Event Card deck holds 50 cards. During normal game play you will not have access all 50 of them. Everyone but the Soviets or those trained by the Soviets may discard up to 2 Tactical Event Cards at the end of each turn - before refilling their hand. The Soviets and those trained by them may only discard 1 Tactical Event Card at the end of each turn. This reflects the more rigid command structure that Soviet doctrine uses.

The US Player drew these 4 Tactical Event Cards.

US TE C at Start.png

The Soviet Player drew these 4 Tactical Event Cards.

Sov TE C at Start.png


Both sides did well in their draws; but then the Tactical Event Cards were designed to give the Leadership those special situations that could be seen in what would be considered to be a normal reaction or situation that could be seen with that particular military organization.

The only 'bad' card I see is the 'MRL Attack' for the Soviets. Considering how inaccurate MRL attacks are then this card is an automatic discard.

Tactical Event Cards are special with regards to being able to be played at anytime during an Action Phase. They may be played before, during or after the activation of orders during an impulse. It makes no difference whose impulse it is. Any number of Tactical Event Cards may be played at any given time to the number held in each players hand.
 
Last edited:

Steve Overton

Member
Joined
Jan 15, 2015
Messages
368
Points
28
Location
Odessa, Texas
At this point the forces have been setup. The CP's have been calculated and put in the draw container. The Turn marker is placed and we are set to start the game. The first impulse CP chit is drawn and it's a US 2 chit.

The US Player may now give 2 orders.

Tn1 Im1.png
 

Steve Overton

Member
Joined
Jan 15, 2015
Messages
368
Points
28
Location
Odessa, Texas
The US Player chooses to give a Movement Order.

This is the Command Radius of one for the Leader in the F5 location. Albanese has been marked with a yellow "x" and the Command Radius outlined in yellow.


Im1 Order 1a.png
 

Steve Overton

Member
Joined
Jan 15, 2015
Messages
368
Points
28
Location
Odessa, Texas
The Regular Fire Team in location G5 moves to H6 (1), to I5 (1) to J6 (2). Total Movement Points expended 4.
The Veteran Fire Team in location G4 moves to G5 (2), to H6 (1), to I6 (2). Total Movement Points expended 5.
Albanese and the Fire Team in location F5 moves to G5 (2), to H6 (1), to I6 (2). Total Movement Points expended 5.
The Regular Fire Team in location F4 moves to G4 (2), to G5 (2), to H6. Total Movement Points expended 5.
The Green Fire Team in location E4 moves to E5 (1), to F6 (1), to G6 (1), to H7 (2). Total Movement Points expended 5.


Im1 Order 1c.png


The ending location for the patrol.


Im1 Order 1b.png
 
Last edited:

Steve Overton

Member
Joined
Jan 15, 2015
Messages
368
Points
28
Location
Odessa, Texas
The US Player has another order he can give, or Tactical Event Cards he could play, but decides to pass because all his units have already been activated with an order this impulse. He chooses not to play a Tactical Event Card and the Soviet Player also declines to play a Tactical Event Card so the first impulse of the game is over.
 
Last edited:

Steve Overton

Member
Joined
Jan 15, 2015
Messages
368
Points
28
Location
Odessa, Texas
The Soviet Player will activate Makarov in location N3 to move. Those in Command Radius may also be activated to move.

Markarov is marked with a yellow 'x' and the Command Radius is outlined in yellow.


Im2 Order 1.png
 

Steve Overton

Member
Joined
Jan 15, 2015
Messages
368
Points
28
Location
Odessa, Texas
Before moving the Soviet Player plays a 'Double Time' Tactical Event Card that doubles the of any unit that is in the Command Radius of a Leader activated to move.


Im2 Soviet Double Time.png
 

Steve Overton

Member
Joined
Jan 15, 2015
Messages
368
Points
28
Location
Odessa, Texas
The first unit to move is the MMG crew in N2. They have a Movement Point Allowance of 5. The MMG subtracts -2 from that, giving them a modified Movement Point Allowance of only 3. The 'Double Time' Tactical Event Card doubles that to 6.

The crew moves to M2 (1), to L3 (1), to L4 (2) to the second story of L4 (2). Total Movement Points expended. 6.


Im2 Order 1a2.png


The US Fire Team can see the Russian crew move into the second level location in hex L4 which could trigger Opportunity Fire.

Location I5 is a blind spot created by the height difference of the second level in L4. Opportunity Fire never requires an order to initiate. Combat units will automatically defend themselves. There is no need for any order to be given by the side wanting to do Opportunity Fire.

The range for Infantry units firing Opportunity Fire is 3 hexes. That's 150 meters in actual terms. Anything further than that and they wouldn't get a good shot at it. Support Weapons and MG's can all activate for Opportunity Fire within the range printed on the counter. For instance if the situation were reversed the PK MMG could initiate Opportunity Fire out to 11 hexes.


Im2 Order 1a3.png


Because the Soviet crew is 4 hexes away the US Player may not initiate Opportunity Fire with the Fire Team in location H6.
 

Steve Overton

Member
Joined
Jan 15, 2015
Messages
368
Points
28
Location
Odessa, Texas
Makarov in N3 then moves to M3 (2) and the lower level in L4 (2). Total Movement Points expended 4.
The two Fire Teams in N4 move to M3 (2) and then the lower level in L4 (2). Total Movement Points expended 4.
The two Fire Teams in O3 move to N4 (2) and then to the lower level in M4 (2). Total Movement Points expended 4.


Im2 Order 1a6.png


The units in L4 are:


Im2 Order 1a7.png


The units in M4 are:


Im2 Order 1a8.png


This ends Order 1 for Impulse 2.
 

Steve Overton

Member
Joined
Jan 15, 2015
Messages
368
Points
28
Location
Odessa, Texas
Impulse 2 Order 2 is for the vehicle crew in location L5 to get out of the middle of the rapidly approaching firefight.

They move to M4 (2) and then to N4 (2). Total Movement Points expended 4.

Im2 Order 2a.png


The ending situation looks like this.


Im2 Order 2b.png
 

Steve Overton

Member
Joined
Jan 15, 2015
Messages
368
Points
28
Location
Odessa, Texas
Thanks Albert.

Not doing as well as I thought I was, I just realized that I didn't put the order list in this AAR.

As the leader you can choose one action from the order list for each number on the CP chit drawn. If, for example the CP chit has a 1 on it that player may give one order from this list.
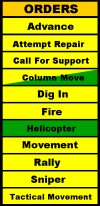
! Orders Expanded All Green.png


Orders Explanation:

Advance - Move one location. Cannot be fired on by Opportunity Fire as a result of this order.
Attempt Repair - Attempt to repair a single broken SW or MG.
Call For Support - If you have artillery or Close Air Support available in the scenario you may attempt to get it.
Column Move - Units that are marked in a column move together. This box is half green. Once you create the column it moves without giving it any orders anytime there is a friendly impulse.
Dig In - A unit, or units in the location of a leader may attempt to dig in.
Fire - Units may fire full strength at a target location. Fire Groups may be formed if a Leader is directing the fire.
Helicopter - Helicopters may move, fire or use Tactical Movement during any friendly impulse without expending an order. They may also use Column Movement.
Movement - Units may move from one location to another.
Rally - Units in the location of a leader may all attempt to rally. Units in a location without a leader attempt to rally individually, each would require a Rally Order of their own.
Sniper - Snipers move and fire in the game when they are told by the owning player.
Tactical Movement - A unit or group containing a Leader may use a combination of movement and firing in the same impulse.


Things you can't do are more than order in an impulse without a Tactical Event Card specifying that you can. Small unit leaders are very busy people. They have a range of things they can, and often, do. The one thing they can't do is more than one thing at a time. There is only so much time represented in an impulse (less than a minute generally.) and people can only do so much in that allotted time. So such moves as rallying a broken Fire Team and then having them try to repair a weapon aren't happening. Rallying and moving; isn't happening. You get one order per impulse.

Those orders can be broken up however you choose. Everybody in a location or the Command Radius of a Leader doesn't have to do the same thing. The issue is, if they do something different than the group, they require a separate order of their own to activate them to do it.
 
Last edited:

Steve Overton

Member
Joined
Jan 15, 2015
Messages
368
Points
28
Location
Odessa, Texas
The first order for Impulse 3 is a Fire Order for the MMG in the 2nd Level of location L4 to fire at the US Fire Team in location H6.


Im3 Order 1.png
 

Steve Overton

Member
Joined
Jan 15, 2015
Messages
368
Points
28
Location
Odessa, Texas
The KN series of games uses a 3 color system. All three dice are rolled everytime there is a result needed because of the possibility of rolling a triple (all three results being the same) but only the values that are relevant are used if the roll is not a triple.
  • A white number in the game means it uses the result of a single white 6 sided die.
  • A black number in the game means it uses the result of a white and black 6 sided die.
  • A red number in the game means it uses the result of a white, black and red 6 sided die.

The MMG has a 7 BLACK Infantry Firepower at a range of 11. The leader cannot add his Command Bonus because, while he is in the same hex, he is not in the same location as the firing unit. The Leader is not activated for this attack.

The MMG has a 7 Firepower, the attack die roll is a 4. 7 + 4 = 11.
The 'Total Attack Value' (TAV) is 11.

The US Fire Team has a morale/experience value of a BLACK 7. There is no cover in their location. They are not moving so they are not on the road but the other terrain in the location is clear, which offers no cover. Their defensive die roll is a 7. 7 + 7 = 14.
The 'Total Defensive Value' (TDV) is 14.

The TDV is higher so there is no result applied to the US Fire Team.


Im3 Order 1a.png
 
Top