Welcome to the LnLP Forums and Resource Area

We have updated our forums to the latest version. If you had an account you should be able to log in and use it as before. If not please create an account and we look forward to having you as a member.

The lead up to Battle at Beda Fomm

Daz

Member
Joined
Oct 22, 2014
Messages
861
Points
43
Location
England
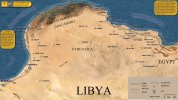
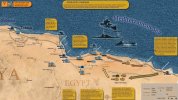
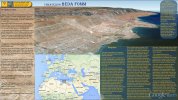
This is just going to be a short series of annotated maps to show what happened during the lead up to the battle of Beda Fomm.
The base map is finished, but I now have to add all the annotations and movement of the units, so its another work in progress I'm afraid, but hopefully you will get something out of it by the end.
Unraveling Beda Fomm.jpg
 

Daz

Member
Joined
Oct 22, 2014
Messages
861
Points
43
Location
England
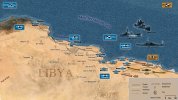
Work in progress.
Edit: Just noticed my escarpments are the wrong way round! The brush just needs flipping over, so easy to fix and will do it later.
Unraveling Beda Fomm2.jpg
 
Last edited:

Daz

Member
Joined
Oct 22, 2014
Messages
861
Points
43
Location
England
I have decided to start further east at the opening stage of Operation Compass.
I have added some units but still plenty of work to be done on it yet.
WIP
Beda-Fomm-Op-map2-Daz.jpg
 
Last edited:

Daz

Member
Joined
Oct 22, 2014
Messages
861
Points
43
Location
England
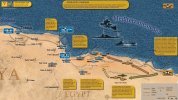
Managed to get a bit more done.
Also decided I need to zoom in, in order to tell the story around the camps, as the divisions are quite tight in that area.
WIP
Unraveling Beda Fomm2.jpg
 

Daz

Member
Joined
Oct 22, 2014
Messages
861
Points
43
Location
England
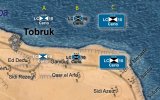
I'm not happy with the amount of room the Corps and higher units take up on the map, so I have made a couple of optional ones.
Trouble is I'm struggling to decide which one to use.
I have set them against the different backgrounds, land and sea.
Which ones do you think I should use A,B, or stick with the large C ones?
Or a different combination altogether?

LC is the Libyan Corps by the way.
https://en.wikipedia.org/wiki/Royal_Corps_of_Colonial_Troops
Corps-counter-options.jpg
 

GoodGuy

Member
Joined
May 20, 2015
Messages
443
Points
28
Location
Cologne
I'm not happy with the amount of room the Corps and higher units take up on the map, so I have made a couple of optional ones.
Trouble is I'm struggling to decide which one to use.
I have set them against the different backgrounds, land and sea.
Which ones do you think I should use A,B, or stick with the large C ones?
Or a different combination altogether?

I suggest to keep the names of cities, camps etc. more in the background, to avoid clutter of black text/fonts on the map.
Maybe all names of towns/villages/cities(are there any?)/camps/regions/oases :p/mountain ranges with grey (or whatever color you were using for "picadilly" etc) and unit numbers/designations with black font.
There seems to be too much information: The "XXX" unit/command level is sufficient, the "10" for example should read "10. Div." or "10th Div", to make sure that it can't be misread as say a Regiment, Bn or even Company (ie. as the 10. Coy, some German units had up to 15 Coys, when continous numbering was used). You could then mark Korps or Army areas/sectors, like you did in your AARs, or - even better - put the corresponding Korps or Army counter behind the frontline units, so that it becomes obvious who's in charge and that you don't have to mention the Korps or Army (say XXIV) in a subordinated unit's (say a division's) counter all the time.

Version A might be hard to read on bright (desert) areas, but you could use the drop shadow effect to counter that effect, if you or others prefer the white descriptions. Version C will be too large if you have a pile of Allied and Axis units sitting next or even on top of each other, so I'd stick with Version B, but maybe with some grey or white drop shadow, to make it easier on the eyes and to make sure that it contrasts pleasantly.

Beautiful maps, btw.
 
Last edited:

Velkan

Member
Joined
Aug 1, 2015
Messages
40
Points
8
Location
Portugal
I'm not happy with the amount of room the Corps and higher units take up on the map, so I have made a couple of optional ones.
Trouble is I'm struggling to decide which one to use.
I have set them against the different backgrounds, land and sea.
Which ones do you think I should use A,B, or stick with the large C ones?
Or a different combination altogether?

LC is the Libyan Corps by the way.
https://en.wikipedia.org/wiki/Royal_Corps_of_Colonial_Troops
View attachment 2446

B for corps and higher looks good and follows the colour pattern of lower units too. We can see all of them clearly with the fullscreen image. Great work Daz!
 

Daz

Member
Joined
Oct 22, 2014
Messages
861
Points
43
Location
England
Some great advice, thanks guys.

Definitely need to de-clutter and like your advice about the black fonts GoodGuy.

The number to the right of the unit icon is always its higher formation, as per the old (and new) NATO standard.
So the 10 is to indicate it belongs to the 10th army.
The number, or name on the left is the name of the unit that the symbol is representing and as you know the XXX on the top is the size indicator, in this case a Corps.
So for example its perfectly acceptable to have say 7 on the left and 7 on the right with a brigade size indicator on the top, without having to indicate 7 Div on the right as it would be assumed.
This of course would indicate seventh Brigade belonging to seventh Division.

I'm not sure what to do if it was a Corps asset though.
Say 7th Brigade as a Corps asset of VII Corps.

Or even 7th Bn Royal Tank Regiment as a Division asset of 7th Division, when the rest of the Royal Tank Regiment is out of the theatre.?
If you mark it as 7 II 7 then people may assume its 7th Bn belonging to 7th Regiment Royal Tank Regiment instead of a Division asset!
Edit: I just looked it up. You use / to separate the chain of command.
So for example the text to the right of the symbol for the unit above would be 0/0/7 to indicate no regiment, no brigade, 7 division.

I don't think there is going to be enough room to indicate Corps boundaries, besides which they don't actually seem to be using a boundary method to separate the divisions on the Italian side.
From what I have read so far its a bit higgledy piggledy, and will likely get worse as they start to retreat.

Likewise for the advance to the jumping off point the two British divisions were moving together and as you will see move together through the gap before fanning out on the other side to the Italian rear, so once again not really adhering to boundaries.
Also the map is very small scale, so the unit symbols are already covering a considerable distance especially if you include the text to the sides, so you could say the unit boundary is actually its symbols side.

One of the things I'm worried about counter B is it looks very much like an infantry unit.
Maybe if I remove the white stroke it will help to distinguish it a bit as a Corps HQ.
 
Last edited:

GoodGuy

Member
Joined
May 20, 2015
Messages
443
Points
28
Location
Cologne
Some great advice, thanks guys.

Definitely need to de-clutter and like your advice about the black fonts GoodGuy.

The number to the right of the unit icon is always its higher formation, as per the old (and new) NATO standard.
So the 10 is to indicate it belongs to the 10th army.
The number, or name on the left is the name of the unit that the symbol is representing and as you know the XXX on the top is the size indicator, in this case a Corps.
So for example its perfectly acceptable to have say 7 on the left and 7 on the right with a brigade size indicator on the top, without having to indicate 7 Div on the right as it would be assumed.
This of course would indicate seventh Brigade belonging to seventh Division.

I'm not sure what to do if it was a Corps asset though.
Say 7th Brigade as a Corps asset of VII Corps.

That's why I never liked the NATO crap :p
Call me old-fashioned, but the old (WW II) way of displaying information has its merits, and it avoids clutter, for sure:

http://tile.loc.gov/image-services/jp2.py?data=/service/gmd/gmd5/g5701/g5701s/ict21202.jp2&res=2

The unit number on the right side (say 7th or 7. for the "7. Arnored Division") and the unit level on top. If you think it is necessary to mention the Corps or Army, then put the roman number on the right side, and the Division/brigade/regiment/or even Coy designation/number on the left. For instance, the "rifle and machine gun 'A' Company, the Rifle Brigade, soon brought the Italian column to halt, ably supported by 'C' Battery, 4 RHA and 'C' Squadron, 11th Hussars."
Basically, at that point, it seemed like a single Company (supported from the East) blocked the retreat of the bulk of the 10th Army, by taking position on a strip from the road to the water line, forcing the Italians to fan out inland. A vital British move, and probably worth showing.
The bottom should be reserved for a unit commander's name, if it appears to be worth mentioning it (eg. Wavell, or "Combe Force").

I don't think there is going to be enough room to indicate Corps boundaries, besides which they don't actually seem to be using a boundary method to separate the divisions on the Italian side.
From what I have read so far its a bit higgledy piggledy, and will likely get worse as they start to retreat.

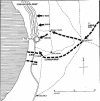
Correct, but you could do it like this:

bedafomm_battle_map.jpg


http://www.desertrats.org.uk/battles1941.htm#Beda
Means, you could display general directions of the Italian 10th Army (or Brigade on the British side), instead of marking Army/Corps sectors.

"During this action a Trooper from 2nd RTR captured two Italian M-13's on foot, by jumping on each and, after opening the hatch, forced the crews to surrender at pistol point." (quoted from the desertrats webby, LOL).

One of the things I'm worried about counter B is it looks very much like an infantry unit.
Maybe if I remove the white stroke it will help to distinguish it a bit as a Corps HQ.
Yes, even though they look beautiful, they look like inf units all around, indeed. Maybe you can convert these back to regular counters, displaying INF, armored and motorized/mechanized units with their respective military symbols. Or, even better, you could use the CO2 approach and create alternative counters with the shapes of tanks, infantry and say trucks (eg. for mot. inf), so that the reader grasps what's going on, no matter whether he's familiar with military symbols/counters or not.

Oh, I found this here, maybe it's worth reading it, as it also mentions the British supply problems :

"The swiftness of the advances, however, ensured each FSD was quickly left behind and barely able to provide the support needed. With the capture of Bardia, O'Connor had hoped its port could be used to alleviate the supply strain. The destruction of the port during the battle and demolition by the Italians before surrender prevented its use. This in turn caused an even greater strain on British truck units. Though a few supplies were brought in through the small port at Sollum, most were brought overland by rail from Alexandria to Matruh, then by truck all the way forward. Any further advance by large forces depended on a solution to the supply problem."

Master's Thesis (from 1976?), Beda Fomm: An Operational Analysis by LTC (his rank in 1993) James G. Bierwirth, USA
http://www.dtic.mil/dtic/tr/fulltext/u2/a284686.pdf
 
Last edited:

Daz

Member
Joined
Oct 22, 2014
Messages
861
Points
43
Location
England
Thanks for the extra reading GoodGuy.
I have actually been doing a lot of reading on this operation and come across a fair few sketch maps, including the ones you posted (not saying I'm ungrateful, how would you know I have seen them), and to be honest I'm loving it.
Every evening I am coming across more information about an operation I knew so little about, when I started this a few weeks back, but its very fragmented.

As I mentioned in the intro, its very hard to patch together all the events as the sketches are very rudimentary and the descriptions localized, often requiring cross referencing many sketch maps in order to get the big picture.
The aim of making this map, is trying to piece together a picture of the movement of the main fighting and command units for this operation. Primarily for my own benefit and understanding as reading the various historic accounts was making my head spin with names of places even Google was throwing back at me with an error message.

For example, what do you know about the railway that stops at Masheifa, right in the middle of this area of operations?
Its clearly marked on the Wiki map here:
https://upload.wikimedia.org/wikipedia/commons/6/63/WesternDesertBattle_Area1941_en.svg

But I have yet to read about a reference to it for this operation, which is why I removed it from my map.
I am beginning to wonder if it has not been built yet, as there is reference to it at a later date here:
https://en.wikipedia.org/wiki/Middle_East_Command_Camouflage_Directorate

Where there is a very interesting article about a dummy one being built that was effective enough for the Axis to bomb it!
But I still don't know if the railway was built to reach Masheifa or it was just a dummy one?

Like I said, some very interesting stuff to research, and I am very much enjoying doing so, whilst using my map primarily to plot my findings, then share them with you guys.
 

GoodGuy

Member
Joined
May 20, 2015
Messages
443
Points
28
Location
Cologne
Thanks for the extra reading GoodGuy.
I have actually been doing a lot of reading on this operation and come across a fair few sketch maps, including the ones you posted (not saying I'm ungrateful, how would you know I have seen them), and to be honest I'm loving it.

Oh you ungrateful fool, just kidding !!!!! :p ;)
Erm, did you stumble over that thesis already, too?
 

GoodGuy

Member
Joined
May 20, 2015
Messages
443
Points
28
Location
Cologne
For example, what do you know about the railway that stops at Masheifa, right in the middle of this area of operations?
Its clearly marked on the Wiki map here:
https://upload.wikimedia.org/wikipedia/commons/6/63/WesternDesertBattle_Area1941_en.svg

But I have yet to read about a reference to it for this operation, which is why I removed it from my map.

You might want to check this:

https://www.yumpu.com/en/document/view/29391803/newsletter-of-the-palmerston-north-sandmanorgnz/5
http://www.sandman.org.nz/news/GenFeb2003.pdf

"One Sapper's War"

I really like that part:

  • "Among items that were brought out under heavy guard were an eight-wheeled high speed armoured car [ hint hint: Sd.Kfz.231, most likely ] ,
  • a Focke-Wulf 190 fighter [ absolutely possible, the 3rd Group of fighter squadron JG 2 was deployed on Sicily, to cover Italian convoys to Africa, in particular to Tunisia, and was redeployed to Bizerta. The 3rd Group had completely switched to Fw 190 fighter planes as early as 1942, and therefor must have been among the very first units that had received that type (the very first production models were issued in Summer 1941 ] ,
  • halftrack troop carriers and long range mobile guns."

If true, then the Brits wanted to take a closer look, I guess. :p
 
Last edited:

Daz

Member
Joined
Oct 22, 2014
Messages
861
Points
43
Location
England
That was a superb find, thanks mate!
I am also a fan of the Train sim games
http://train-simulator.com/
so the whole article was of particular interest to me.
I have no idea why Railworks has not done more on the WW2 scenarios and graphics.
There is a huge hole in the market there.

As for the thesis, I had already purchased it on the Amazon kindle store:sour:
 
Last edited:

GoodGuy

Member
Joined
May 20, 2015
Messages
443
Points
28
Location
Cologne
Complete....

For example, what do you know about the railway that stops at Masheifa, right in the middle of this area of operations?
Its clearly marked on the Wiki map here:
https://upload.wikimedia.org/wikipedia/commons/6/63/WesternDesertBattle_Area1941_en.svg
I don't think that the railroad line ended at Masheifa (Misheifa?), as some sources (including the wiki source about Churchill's deception "artists") mention that materiel and vehicles were brought right to Fort Capuzzo, and that Masheifa was only used as deception hub. Therefor the creator of the wiki-map seems to have misinterpreted the word "railhead", which can be found in a number of books covering the time frame between the preparation for "Crusader" and the actual operation, as "the farthest point to which the rails of a railroad have been laid" (dictionary definition).

I'd go for the other definition of the word railhead: "a railroad depot at which supplies are unloaded to be distributed or forwarded by truck or other means."
The Capuzzo station must have been so small and unremarkable, that German aerial units did or could not identify it as important hub.
I compared actual google map images with the map on wiki, and it seems that - nowadays - the tracks lead all around to Sollum (in a really wide bypass turn), in particular to the ridge slighty north to the serpentine road that leads up to the point where the old Sollum barracks must have resided. The modern railroad ends near the historical position of the Sollum Barracks.

Other sources indicate that the railrad had been extended to Capuzzo, and still other sources mention the Capuzzo-Tobruk Railway, where it's not clear when that part had been laid.
As Sollum, residing right at the Sea, and north of the Halfaya Pass, only offered a bottleneck - the serpentine road up that ridge - it's pretty obvious that rails had to bypass that area. I followed the rail tracks from Sollum (in a bypass turn) to the WEST then South, and figured that the modern railroad then goes East to Mersa Matruh, El Alamein and even further East, connecting Alexandria, and Cairo, with one or another branch leading south, connecting military bases here and there, including a military airbase, or (way South of Cairo), connecting industrial quarters.

The modern rail line seems to follow the historical track bed to quite some extent, at least from Masheifa to Mersa Matruh, and also partially (or even fully?) to El Alamein and Alexandria.

On Google maps, on the wide bypass turn around Sollum, you can see that just West and South West of Sollum all defensive positions are still visible, and that there is a junction (if you follow the tracks from Sollum down south-WEST) and that from that point a track bed is branching off and leading north (leading right to the "Gateway Sollum" border post), but with the rails missing. Just East of the border post are WW2 trenches, bomb/shell craters and AT gun positions, right at the post is a huge rock, but the trackbed goes even further - entering Libya, but it's not clear whether it ends slighty left of the (Libyian) "Gateway Emsaed", or if it even went up to the GREEN house south of the town of Musaid, where both points are near the general historical Fort Capuzzo area, if you look at historical military maps.

That said, err .. researched ;) , the extended railroad line must have led right up to Capuzzo, and it's questionable if Sollum was connected back then. Sollum was too small, and the barracks on the ridge too exposed (air strikes) to justify a depot/station up there, so I am guessing that the Sollum turn was established after the war.
In turn, Libya must have removed the tracks on its territory after the war, as the railroad went right over the border, without the possibility to check trains and freight, as the sat images do not show traces of a (rail-)checkpoint.

ORIGINAL : "Middle East Railways" by Hugh Hughes:

excerpt 1.png

ORIGINAL: "Directory of Railway Officials & Yearbook", Tothill Press, 1947:

excerpt2.png

You'd have to buy these books (or check them in a library) to confirm when the military extension of the railroad had been finished.
With the current hints, I'd say Capuzzo was connected in 1941, Sollum probably not, and at one point there was a complete El Alamein - Capuzzo - Tobruk rail line.


In 1943, the rail line was completed, connecting Beirut (Lebanon) with Tripolis ( Libya !!!).

This military map gives another hint, and shows a real railhead (as in "endpoint") at Tobruk:
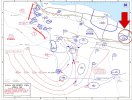
Map_of_siege_of_Tobruk_1942 Kopie.jpg

I have marked the hub with a circle. So, the extension to Tobruk existed in May 1942, at least. The wiki section holding the map above states:
"Although not as much a reason for its strategic significance, the British built a rail line from El Alamein to Tobruk during the course of the war. This rail line was significant both for purposes of supply and as a sense of pride to the Allied troops, as the rail line was built through a little-populated, inhospitable desert."

So, during Operation Crusader, at least the line El Alamein - (fake) Masheifa - Capuzzo must have existed. Somewhere between autumn 1941 and April 1942, the Tobruk-Capuzzo section must have been completed.
Eventually, in 1943, the line went from Alexandria to Tobruk. I am not sure what town of Similla that would be, as "Similla - Tobruk" is being mentioned quite often, and there is a town of Similla north of Cairo, nowadays, but another section explains that Similla's locals/civilians were evacuated in 1942, and I am not sure whether that was necessary in the general Cairo area (even though the British HQ personnel in Cairo had started to burn confidential maps and documents, when the Germans had reached El Alamein).
I think one of these sources below mentioned the evacuation, IIRC, and seemed to suggest that the civilians were evacuated from places in the hub's vicinity for secrecy reasons (so that the germans don't get to know about the major supply point/operations).
The modern Similla resides around 60 km north of Cairo, 111 southeast of Alexiandria, 74 km south of the Al Burj (Burg) harbor area and 131 km west southwest of the deepwater port in Port Said, so it's absolutely possible that supplies were hauled from Port Said and Alexandria to Similla, as that area was somewhat protected/hidden inland, and as that hub could also support Cairo, until Alexandria was connected.
But I am still not sure if that's the right Similla.

http://nzetc.victoria.ac.nz/tm/scholarly/tei-WH2Engr-c9.html :

New Zealand Engineers, Middle East

CHAPTER 9
The Western Desert Railway


"To complete the additional section of the Western Desert Railway Extension in time for the Eighth Army's first offensive, the Construction Group and its Pioneer helpers had worked long hours for seven days a week through the torrid winds and dust of summer into the bleakness of winter.

But their efforts would have gone for nothing without the wonderful efforts of the transportation organisation in Alexandria, which was responsible for the supply, loading and despatch of the large daily requirements for the two miles or so of railway track. Often the material was loaded into wagons straight from the ships' holds and then the Railway Operating units had to fit the trains into a timetable of a very busy single-track line with three greater priorities—food, water, ammunition. The supply train nearly always arrived at track-head at 7 a.m. in spite of enemy interference, the odd hot box or a broken coupling, a tremendous achievement by the Operating Units and fully appreciated by the Construction sappers.

And then, while the Division moved up to and into the battle for the escarpments and ridges south-east of Tobruk, the Group had replaced twisted rails and splintered sleepers resulting from enemy bombing, bombing that did not prevent the Operating Group from running its trains."


http://nzetc.victoria.ac.nz/tm/scholarly/tei-WH2Engr-c14-1.html#name-026613-mention :

A section referring to events in 1942 (afaik):
"While the water reservoirs at Capuzzo, Misheifa and Similla were being repaired the whole of the running was performed with diesel engines, but a partial changeover to steam loco operation was made on the 28th and three days later (1 December) the diesel-electric locos were worked over the Capuzzo-Tobruk sector, leaving the steam locomotives to operate between Similla and Capuzzo."


http://nzetc.victoria.ac.nz/tm/scholarly/tei-WH2Engr-c14-1.html#name-026613-mention
Railway Operating Group

"In spite of the precautions to ensure that no information leaked out regarding the build-up for the Eighth Army attack in October 1942, the New Zealand Railway Operating Group could not help knowing that something big was afoot. For weeks they had been pushing train loads of stores forward to Burg el Arab by day and by night and they had watched the entertaining sight of army transport evacuating native families and their assorted livestock; opinions were divided as to whether this was a precaution against espionage or merely to reduce the fly nuisance.

A highlight of the period was an attempt by Italian commandos, who were landed from a submarine near Burg el Arab, to blow up the line near Hawaira. The only result was a broken rail and the loss of a few thousand gallons of Nile water, for Gurkha troops soon rounded up these rather amateur demolition experts. The Gurkhas patrolled the area for a week or so but there were no more efforts to dislocate the railway system. The operating sappers manning the stations got along very well with the little smiling men from the mountains of North India. Few could speak much English but the two races met on common ground around a draught-board. The Gurkhas won nearly every game.

It has been related that, on 5 November, 2 NZ Division was concentrated to the south of Fuka. At a minute past midnight on the same date, new railway operating instructions came into force, placing the responsibility for the running of traffic as follows:

‘OC 16 NZ Rly Op Coy—Stations from amriya to hammam. The 16 NZ Rly Op Coy will be responsible for the signalling and despatch of all trains at amriya station. Shunting duties at amriya station and depot will be carried out by 16 NZ Rly Op Coy. Two diesel shunting engines are located at amriya depot.

‘OC 17 NZ Rly Op Coy—Stations hammam to railhead. The 17 NZ Rly Op Coy will be responsible for the signalling and despatch of all trains at hammam station and West thereof. Also for shunting railhead depots.’

Railhead for the moment was at Alamein while Railway Construction Groups worked across the battlefield towards Daba, which became the railhead on the 10th when the first stores train arrived there. The repair gangs had not only to deal with shell and bomb damage but also had to replace sleepers and rails taken from the road bed by both armies for the construction of splinter-proof shelters.

While 2 NZ Division was stacking up at the foot of Halfaya Pass at the Egyptian border (11 November) the construction train was working west of Daba, to which station Major Pearse had shifted 17 Company Headquarters, and from where the Group was operating some American main-line diesel-electric locomotives. The arrival of these was well timed as steam engines were dependent on water and the damage to the water pipelines and reservoirs had not yet been made good. Major Aickin writes:

‘These diesel locos, had been constructed and shipped in such a hurry that there was insufficient time for carrying out the customary service trials. However, although the locomotives were practically nothing more than working blue prints when they reached us, they arrived in the nick of time and served our needs admirably. The NZ engine drivers quickly learned to handle them.’

Railhead was at Matruh on the 13th, when three trains were despatched from Daba to that destination; by the 25th, after relief by 193 Railway Operating Company, RE, 17 Company had manned and was operating from its headquarters at Capuzzo the MisheifaCapuzzoTobruk Road section. On the same day 16 Company, now relieved by 115 (Indian) Railway Operating Company, had settled into its old ‘possie’ at Similla and taken over the SimillaMisheifa section."


These sections are particularly interesting:
  • "A changeover to diesel-electric locomotives was completed on 8 March [1943] when WD Locos 9332 and 9327 hauled the last steam-operated service page 399 (Train No. 5) over the Tobruk Road – CapuzzoMisheifa section. The steam loco depot at Capuzzo closed the same day and coal, oil and wood supplies, together with depot equipment, were despatched to Misheifa. The rail loop at Tobruk docks was finished on 10 March and on the following day a 17 Company diesel crew and brakesman ran the first train over the new extension that finally linked Alexandria with Tobruk. In a way it was a pity that it was not Kiwi construction men who put the finishing touches to the Western Desert Extension."
  • "The completed line from Beirut to Tripoli had been opened with some pomp and ceremony by General Alexander on 21 December [1943], and it was now possible, but highly improbable until the war was over, to travel by rail from Cairo to any continental city.
Until that point, supplies were either hauled to El Alamein (and then shipped to Capuzzo, later on Tobruk, by train), or the tracks just went to Cairo and then to Beirut, instead to the port of Alexandria, with El Alamein then serving as main supply hub. I am just guessing here, you'd have to read all that stuff to make sure. :p

Whatsoever, if the Germans would have put similar efforts into building up a railway supply system (from Tunisia) up to Tobruk or even Capuzzo/Misheifa, their supplies (especially fuel) would not have led a miserable existence in the ports of Tunisia, where they clogged the depots more than often, due to the low number of motor transports bringing supplies to the front. Tank formations sometimes just sat in the desert for 1 or 2 days, until fuel could be brought in. The Italians, with their low number of 700 (at some point, afaik) trucks/transports were even worse off, as their motor pool had to haul supplies for 250,000 troops, before the Germans arrived in force.
 
Last edited:

Daz

Member
Joined
Oct 22, 2014
Messages
861
Points
43
Location
England
Latest mods to page 2
Reduced clutter and am happy with the higher HQ's now.
Decided to drop the text to the right of the unit counters, higher formation attachments will be mentioned in the text if know them from now on. I might also do an OOB page later.
Beda-Fomm-Op-map2-Daz.jpg
 

Daz

Member
Joined
Oct 22, 2014
Messages
861
Points
43
Location
England
I apologize for my lack of input on the forums lately.
I am in fact monitoring the, extremely complicated,on going Syrian conflict in my spare time at the moment.
 
Top