Welcome to the LnLP Forums and Resource Area

We have updated our forums to the latest version. If you had an account you should be able to log in and use it as before. If not please create an account and we look forward to having you as a member.

CO2 BEDA FOMM Quick AAR

john connor

Member
Joined
Oct 22, 2014
Messages
2,488
Points
63
Age
60
Location
Brussels
A quick AAR as I play through this scenario in CO2. One excellent feature of CO2 is that it makes AAR making MUCH easier, as you can get a load more information into one screen.

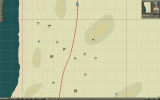
So here's the starting screen. In one image you can see (and read) the briefing and the OB. Great.

1.png


Sounds like an exciting scenario. I haven't played it before (except in testing the release build of CO2) and that makes it doubly interesting for me. For a long while now, it seems, I've been playing CO1 scenarios that I knew very well.

Basically, a massive Italian force is in retreat down the red coast road we see on the map and 7th armoured had been tasked with cutting it off. This is an historical battle and the briefing gives the historical results. Combe Force, which I already have on the map, is an advance guard from 7th Armoured and will have to hold a piece of fairly featureless, flat ground, without natural cover, against a vastly superior force, for much of the scenario.

I'll be playing this through on slowest speed all the way.
 

john connor

Member
Joined
Oct 22, 2014
Messages
2,488
Points
63
Age
60
Location
Brussels
The objectives are refreshingly simple! Kill as many of the Italians as possible, hold the 2 objectives (both are split even between completion and occupation).

As you can see, with the grid on, it's a large map - 32 by 41km - but probably most of the fighting is going to take place in a 10km corridor extending from the coast to the other side of the Via Balbia.

2.png

The Via Balbia was named after the Italian Governor General of Libya - Italo Balbo - when Libya was an Italian colony. He died in 1940 and the road (now known as the Libyan Coastal Highway) was named after him. It's 1,800 km long, started by Mussolini in 1937. In the recent civil war control of the road, running through Sirte and Benghazi, was a major objective for both sides. So it's still there.

Normally I like to go to Google Earth to get an idea of the landscape, but one picture is going to suffice here, I fear:

3.png

Featureless.

The street view car hasn't made it up this road yet. Here's a photo though:

4.png

Looking north in the direction the Axis will come from.....

I guess if you want cover you have to provide it yourself, mostly.
 
Last edited:

john connor

Member
Joined
Oct 22, 2014
Messages
2,488
Points
63
Age
60
Location
Brussels
The new interface is great for AARs! Another photo highlighting Combe Force in the OOB (expanded) and showing some detailed stats on B Squad, King's Dragoon Guards, attached to the 11th Hussars HQ. 11 Hussars appears to be a long range scouting unit consisting of 32 armoured cars of various types.

5.png

Overall, this unit has excellent stats. This one has the Marmon-Harrington AC, but the other two 'line' units in the company have a mix of Morris and Rolls Royce ACs. This kind of thing:

Rolls-Royce_Armoured_Car_Bardia_1940.jpg

The AT capability for all 11th Hussars is limited to the Boys AT rifle, in the case of the Rolls AC it's mounted in the turret. Pic below. It was not a popular weapon (as the caption below suggests....the photo coming from a NZ forces history site), reputed to virtually dislocate your shoulder when fired, and then not be very effective....

WH2Art051a.jpg
 
Last edited:

john connor

Member
Joined
Oct 22, 2014
Messages
2,488
Points
63
Age
60
Location
Brussels
Besides the 11th Hussars AC recon group, I have only 4 line rifle companies (motorised) at the moment. That's around 500 fighting men, I think. They have generally great stats. The aggression - as with all Combe Force - seems low, but only because the other stats are relatively high, I think - they're aggressive enough I would have thought. They all enter quite fatigued and will need to rest during the night, if possible, but certainly could go into action now. Cohesion is great, generally. I've highlighted one company in the pic below. The leader stats seem to be set around a generic 70% for all my leaders, including this unit.

7.png

The line companies all come from the 2nd Rifle Brigade. They have a mix of transport, as shown in the pic. Once again, AT capability is limited to the dreadful Boys AT. This makes me check the reinforcement tab!

8.png

It seems that I will get a significant injection of armour between 3 and 5pm.
 
Last edited:

john connor

Member
Joined
Oct 22, 2014
Messages
2,488
Points
63
Age
60
Location
Brussels
Until I get the armour I will have to rely on the one dedicated AT unit plus arty assets if tanks appear. I have some guns that could be used flat trajectory, in a push, plus the AT unit. Confusingly, both the AT unit and the AA unit have the same name:

9.png

I guess the AA guns will have an AT use too, if necessary. I'm not sure what the state of play is with the Luftwaffe, and the briefing has said nothing. Did the Italians have an airforce operational in this battle? I don't know.

Those twelve 2 pdr AT guns have, I have read, an effective range of under 500 metres. I'll check the exact range in the performance part of the item sub tab in the E&S tab.
 
Last edited:

john connor

Member
Joined
Oct 22, 2014
Messages
2,488
Points
63
Age
60
Location
Brussels
Finally, the arty units:

10.png

The rifle Bn has five 3 inch mortars. Plus Combe Force has a dedicated arty unit with eight 25 pounders.

Along with the Base unit, that's the OB I start with. Basically, it's a motorised infantry Bn plus a recon unit with 30 odd armoured cars, plus a small amount of arty support. Within 3 to 5 hours I can expect help from some tanks.

Time to work on the plan.....
 

john connor

Member
Joined
Oct 22, 2014
Messages
2,488
Points
63
Age
60
Location
Brussels
Using the new coloured LOS Area tool to try to find decent ambush points. This is assuming the Italians will come marching straight down the Via Balbia. So, if I centre the tool on the road then (rather obviously) the ground in the lee of the two slight hills remains covered until units draw parallel. The road is at an alt of 3m, by the way, then the 'hills' rise to 9m, with an intermediary 6m contour. I have marked 2 potential ambush set up points, with circles. Could it be that if I manage in secret to set up units here then an area of the road will become a good killzone? It's a little sophisticated by my usual tactical standards. How long would the effect last, I wonder? It might prompt the AI Italians to consider going round my flanks, which, since I have very few forces available, I won't be able to cover too well.

11.png

Nevertheless, I'm tempted to try to set-up the twelve 2 pounder AT guns at point 1 and the AA unit at point 2. But what if they come over those 'hills' and down onto the positions? I could put units on the hills too, but that would spoil the surprise. It all sounds a bit too tactical really. As usual playing this game and having no military experience, I really haven't a clue......
 

john connor

Member
Joined
Oct 22, 2014
Messages
2,488
Points
63
Age
60
Location
Brussels
The Wikipedia page on the 11th Hussars is nice, brief, informative:

http://en.wikipedia.org/wiki/11th_Hussars

From that I learned that they were formed in 1715, were at Waterloo, charged with the Light Brigade and were the first British cavalry unit to be mechanised. They ended by being merged with another unit in 1969. Here they are just before WW1 escorting a German Prince through some standard industrial-grey English town, on horseback.....

The_11th_Hussars_Escorting_the_Crown_Prince_of_Germany.jpg

Not much to do with Beda Fomm, but the sense of history is appealing. It's possible - though perhaps not likely - that some of the men on horseback there later took part in Beda Fomm, driving Marmon-Harrington ACs or Rolls Royce ACs....
 
Last edited:

john connor

Member
Joined
Oct 22, 2014
Messages
2,488
Points
63
Age
60
Location
Brussels
Anybody looking at this AAR? If so, can anyone advise what to do to best use the Hussars, the recon unit? They seem very vulnerable to me - thin skinned and obvious.
 
Joined
Oct 24, 2014
Messages
83
Points
8
Age
68
Location
Groningen, NL
Website
springelkamp.nl
When I don't know what to do with some units, I usually keep them as a reserve, and then at some moment they suddenly become very useful, for instance to recapture some rear area objective - although in this scenario that particular use is not to be expected.
 

EdJaws

Member
Joined
Jan 11, 2015
Messages
76
Points
8
Age
72
Location
USA
I'm reading it and it's an excellent write up John Connor, I'm really enjoying it. I played this scenario the other day and had a blast. I won't give away any surprises but I too played it slightly similar to your thinking. I'm sure you'll enjoy it too.

I will tell you I got a decisive victory with all default options and not losing a single unit. I basically intermixed the Hussar units with the rifle brigades across the objectives and the road.

Spoiler below:


Be careful east of the main road as the Italian units will try to push through on the secondary road.

Have fun.
 

john connor

Member
Joined
Oct 22, 2014
Messages
2,488
Points
63
Age
60
Location
Brussels
Thanks Erik and Ed.

Yes, when I was playing it through on the first build (I played about a day, I think) I saw the AI coming down the coast side (west of the main road), Edjaws, but that didn't worry me as much as the idea that the AI might go right around me through the big open spaces east of the road. I had thought to mix Hussars in also. The reserve idea is also great, Erik, as I was thinking that in order to have a go at the main objective (kill em all....) I would need some unit free to attack into the flanks of stuck enemy units.

Decisive Victory with no losses!! Great stuff. It would be, to say the least, unusual if I ever achieved that on a first proper run-through.....
 
Last edited:

EdJaws

Member
Joined
Jan 11, 2015
Messages
76
Points
8
Age
72
Location
USA
Now I'm wishing I would have saved the AAR, and a screen shot of my initial deployment, one picture worth a thousand words thing.

I didn't forward deploy as far as you're planning. I kept most of my unit within and north of both the objective circles. A couple of unit on each side near the road and a unit or two each at the south end but within the objective circles. It's going to be hard to hold the objectives as one enemy unit seemed to break my control of it.

I put the initial artillery unit near the SE ridge from objective #2 and manually issued continuous bombard orders whenever an enemy unit threatened an objective or tried to breakthrough on that eastern ridge above obj. #2. I also placed one of the gun units more to the east of your #3 position behind that ridge.

The first set of reinforcements came through the gap where your #2 is to choke off the enemy units trying to breakthrough to the east. Later reinforcements can be used to cut the road, while all artillery units would be manually controlled to mass bombard.

IIRC, there were over 5000 enemy units put out of action and I suffered about 300 casualties.
 

EdJaws

Member
Joined
Jan 11, 2015
Messages
76
Points
8
Age
72
Location
USA
Heh, now I know better to rename a recording. I still had the recording of my play through of Beda Fomm but I did a save so I could take screenshots later and lost the complete play through, damn it.

Anyway I did get a couple of screenshots of my initial deployment and the moment of arrival of the first wave of reinforcements at the objectives.
 

Attachments

  • initial deployment and first contact.png
    initial deployment and first contact.png
    269.3 KB · Views: 33
  • first set of reinforcements arriving.png
    first set of reinforcements arriving.png
    278.3 KB · Views: 31

john connor

Member
Joined
Oct 22, 2014
Messages
2,488
Points
63
Age
60
Location
Brussels
Thanks Ed. I've started with my original plan now, though it's not very different to yours. It's interesting, but I'm guessing that this is one of those scenarios where if you play as Axis it will be very difficult to lose also, because you will, as human, do things the AI won't do (use the whole map, perhaps). But I could be speaking too soon. I'll play it through as Allies first and see if I can do anywhere near as well as you.
 

john connor

Member
Joined
Oct 22, 2014
Messages
2,488
Points
63
Age
60
Location
Brussels
So, when I give the orders, it looks like this:

13.png

Great new 'Plan' window that lets you click easily through each order you've given.
 

john connor

Member
Joined
Oct 22, 2014
Messages
2,488
Points
63
Age
60
Location
Brussels
An hour and a half later, at 13.25, and nearly all my units are in place, the positions of some of them tweaked slightly:

13a.png

The Italians have just started to appear. I guess that lead unit is only visible to my own advance unit.
 

john connor

Member
Joined
Oct 22, 2014
Messages
2,488
Points
63
Age
60
Location
Brussels
13.46 and my scout unit - those 10 armoured cars deployed around a kilometre and a half from the Via Balbia - has registered targets, but still doesn't fire.....

15a.png
 

john connor

Member
Joined
Oct 22, 2014
Messages
2,488
Points
63
Age
60
Location
Brussels
Three quarters of an hour later and I'm wondering about the aggressiveness of the 11th Hussars. I made an orders mistake too, by ordering them on low aggro, to compound things. In their original position they sat in place without firing whilst the Italian column streamed past 1.5km away, so I ordered them round the hillock to the lee of the little hump south of them, and closer to the road (their position in the pic below). They got there and started to engage the column, but it just ignored them and moved on. So now I've given them another move order. So much for that clever little bit of tactical play.....

16a.png
 
Top