Welcome to the LnLP Forums and Resource Area

We have updated our forums to the latest version. If you had an account you should be able to log in and use it as before. If not please create an account and we look forward to having you as a member.

Decision at Clervaux AAR

Joined
Jun 5, 2022
Messages
34
Points
8
Age
54
Location
England
This post is just a few initial immediate observations after a quick look at the briefing and map. I'm aiming to do a lot more planning for this AAR than I have up 'til now so these annotated screenshots are just a jumping off point prior to my actual planning stage and represent a few things that immediately jump out at me when I first take a look at the map and placement of units.

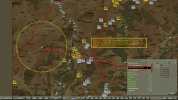
First thoughts then are the potential for the enemy to encircle a few of our units in the North of the map.

1a - map top annotated.png
Potential encirclement

Now, we do have plenty of units to both the East and West currently sitting on two of the objectives so it's not disastrous by any stretch, but it strikes me as something we need to be aware of.

The next thing I notice is in the upper-middle section of the map where we seem to have a big advantage in numbers. It's currently 05:30, before sunrise, so it's likely we're just not seeing the full complement of enemy units yet, but I wanted to note it as a potential for us to push through and maybe turn North and South respectively in a bid to split the enemy's lines and maybe solve the problem of the enemy units that are largely unopposed to the south(see final map below).

1b - map upper middle annotated.png
Potential enemy weakness? or maybe just poor intel!

In the lower-middle portion of the map is an area that's sparsely populated by both sides. We do have some Infantry units to the immediate North of the marked area but on the whole it's a weak area for both sides. I'll have to figure out how I'm going to plug gaps in the line like this.

1c - map lower middle annotated.png
Weak lines for both sides

Which brings me nicely onto another weak spot in our lines, and one which is the most worrying by far. Here we have a very large grouping of enemy units which are largely unopposed by our chaps. It's a very big hole in our lines and it's going to take some planning to plug it I think. Very worrying. The fact that it's in the far South just adds to the problem. My immediate thoughts are to see if we can bring some of our units in the central portions of the map that I mentioned above down to help reinforce this area. We'll see when we come to the planning stage.

1d - map bottom annotated.png
Large enemy presence. Potential disaster for us...
So, those are my very early, immediate thoughts regarding some of the more obvious strengths and weaknesses. In the next post I'll be starting to make a more specific plan of action looking at the main objectives before we move onto the plan of action (edited because I got sidetracked by objectives!!). See you then. Good luck, and God bless.
 
Last edited:
Joined
Jun 5, 2022
Messages
34
Points
8
Age
54
Location
England
Let's have a closer look at the objectives next.

St. Vith is a main objective and one which we more or less have under control. There is the issue of the gaps in our line there but we'll figure something out when we start planning the movement of our troops.

2a - map St. Vith objective annotated.png
The St. Vith objective

I was wondering about the two bridges circled in red. If we could blow those bridges any attacks would either have to come over the bridges directly South of St. Vith, or they'd have to push further West first in order to use the main highway there, which seems like a bit more of a headache for them either way. I've never blown bridges in this game yet so if I choose to do that it'll be a learning experience for me if nothing else. I'll have to consult the manual as to how it's done. I seem to remember it being simple enough. I do know there's a 'Deny Crossing' order anyway. we'll see.

We're given a choice now of either: 'Holding Troi-Berges Area', 'Blocking Bastogne Approach', or 'Securing Marnach'. I know from the briefing that it's important to hold the enemy here and stop them from pushing through the lines, especially with regard to Bastogne. However, here it says to Block the approach to Bastogne. This isn't going to be easy since it's a very large area to block, and as I point out in the screenshot I'm not entirely clear as to what the difference is between Blocking and Holding. Another one for the manual I think.

2c - map Bastogne Approach objective annotated.pngBastogne Approach

This is one of those objectives that gives us a choice of which to take. There are 3 that we can choose from, and taking any one of them I believe should secure the 17 VP listed. Here are the other two.

2d - map Trois-Berges Area objective annotated.pngTrois-Verges Area

2b - map Marnach objective annotated.png
Marnach is a much smaller objective than the other two

Whichever one we concentrate on we'll still have to stop the enemy getting through our lines anyway so it's maybe a moot point as to which one of those three is more important. The briefing is clear. Don't let them push through our lines. It actually says, "No one comes back!". That's pretty clear!

The only other objective I wanted to mention is the one(two in fact) at the far South of the map, Wiltz and Upper Wiltz. These two are already held by our chaps but they're also already under some pressure from a large contingent of enemy units that have built up in the area.

2e - map Wiltz objectives annotated.png
Wiltz and Upper Wiltz

I think that's enough to be getting on with now. Next up, we start to plan for our initial orders.

Until next time. Have fun.
 

Attachments

  • 2c - map Bastogne Approach objective annotated.png
    2c - map Bastogne Approach objective annotated.png
    3 MB · Views: 4

Keydet

Member
Joined
Jun 7, 2015
Messages
759
Points
18
Age
72
Location
Suffolk, VA
I am impressed with your at start observations. I think it reflects the uncertainty in the minds of the US commanders which remained yet on the second day. Nevertheless I have to check the briefing to ensure it reflects the knowledge the commander would have of the last 24 hours. Also, I have to ensure there is enough intel to disabuse the US commander of notions to attack for anything other than to restore lines. I'll re-read my copy of the 112 RCT G-2 log to see if the intel picture for the US should be improved.

Several of the KOAD scenarios have problems with German AI. The AI inclination to take time to replan/ move formations around at start, delays the real start of the action. Tuning the objectives to overcome this has been difficult.
 

john connor

Member
Joined
Oct 22, 2014
Messages
2,488
Points
63
Age
60
Location
Brussels
It's true what Paul says - some of these very large and short KOAD scenarios definitely struggle to represent history, due to the AI second guessing the designer and deciding to move around the bulk of starting positions to suit its own appreciation of the field. (Ironically, we could say that this is a sign of a successful, dynamic AI - it just might not be 'historical'...) This is compounded by the sheer number of units causing traffic jams. I've tried in many scenarios - not just KOAD - where this kind of thing might be an issue, just doing nothing for 12 hours or so of game time - to give the AI time to rearrange itself at start (the issue can occur with the AI on defence too). But with a 24 hour scenario you've not much left then.

The proposed solution - some kind of scripting available to the designer to fix the AI starting moves and objectives etc - is possibly in the pipe line. But it's a very very long pipeline, we would have to say....
 

Keydet

Member
Joined
Jun 7, 2015
Messages
759
Points
18
Age
72
Location
Suffolk, VA
we could say that this is a sign of a successful, dynamic AI - it just might not be 'historical'...) ...

The proposed solution - some kind of scripting available to the designer to fix the AI starting moves and objectives etc - is possibly in the pipe line.
Sometime ago I concluded CO2 is a meeting engagement game engine (for instance a very major C&C measure, unit boundary's, is not modeled in CO2) and all scenarios should have been limited to that context. I am unsure if knowing that ahead of time would have dissuaded me from making KOAD. So when it comes to a major offensive where the dispositions of the assaulting forces are the result of weeks if not months of planning CO2 AI can be content with the "plan" if the designer can arrive at a sweet spot of objectives and objective weighting.

I believe the three Dec 17 scenarios come close to achieving that.

One big headache has been where all but a few bridges are down. Several divisions are supposed to rebuild the bridges in the "assigned" zone. Instead the AI sends the divisions off to the bridges which are intact. The AI does not even examine the logistics consumption, fatigue of the troops and time lost trade off between the road march and waiting for the bridge to be rebuilt. I have made maps for German AI use only which have artificial barriers to divisions switching zones. A desperate design choice.
 

john connor

Member
Joined
Oct 22, 2014
Messages
2,488
Points
63
Age
60
Location
Brussels
That's a really good observation, Paul - that it's a meeting-engagement engine. Imho, it definitely works best where the scenario is set up to allow both sides to jiggle starting positions unhampered by the constraints of either historical offensive jump-offs and attack plans or fixed dug-in, carefully arranged defensive positions, because at start the AI (whichever side it is controlling) always wants to ''make its own decisions'' on dispositions, regardless of such constraints. But the long-ago suggested LUA add-on to allow scripting (or some other solution), at least for scenario starts, would be a brilliant addition, to force the AI to pay attention to such constraints. I still hope it really is in the pipeline.

Actually, it would be great to have a list somewhere of the more 'meeting-engagement'type scenarios that are available. I fear there's not too many, actually. The one I'm playing right now - the 'what-if' Spearhead v Reich, works very well, I think.

Scenarios where one side attacks can work if the player takes the Defending side, because the player can then keep all the carefully set-up defensive dispositions. But, even so, in scenarios where the attack has to funnel through a restrictive number of choke points or past obstructive terrain (whether by bridge building or otherwise) then the greater the unit count for the attacker, the more the AI can cause chaos trying to make its own mind up about how to play the attack.

But then again, sometimes it all works beautifully. I still generally - even whilst waiting for the long-anticipated update - have no problem finding scenarios that are very challenging where the AI does a brilliant job.
 
Last edited:

Keydet

Member
Joined
Jun 7, 2015
Messages
759
Points
18
Age
72
Location
Suffolk, VA
... due to the AI second guessing the designer and deciding to move around the bulk of starting positions to suit its own appreciation of the field. (Ironically, we could say that this is a sign of a successful, dynamic AI - it just might not be 'historical'...) .....

The proposed solution - some kind of scripting available to the designer to fix the AI starting moves and objectives etc - is possibly in the pipe line. But it's a very very long pipeline, we would have to say....
I'd prefer to look at a designer's option to toggle AI planning and positioning complete at start. That is what ever the AI comes up with the units ar instantly moved to the FUPs and locations in the friendly controlled area. I for one am tired of the defender knowing the historical plan. In the case of the BoB I'd prefer to recreate the uncertainty and confusion an unconstrained AI might bring forth.

OBTW I have reworked the scenarios to start 6 minutes early so the guns may fire at 0530. With orders delay set to 0 all fire missions take 6 min to fire. (nevermind that in a major offensive all the fire missions are laid in well in advance of the Start).
 
Joined
Oct 20, 2014
Messages
1,185
Points
63
Age
76
Location
Livonia, MI (Detroit-area suburb)
I'd prefer to look at a designer's option to toggle AI planning and positioning complete at start. That is what ever the AI comes up with the units ar instantly moved to the FUPs and locations in the friendly controlled area. I for one am tired of the defender knowing the historical plan. In the case of the BoB I'd prefer to recreate the uncertainty and confusion an unconstrained AI might bring forth.

OBTW I have reworked the scenarios to start 6 minutes early so the guns may fire at 0530. With orders delay set to 0 all fire missions take 6 min to fire. (nevermind that in a major offensive all the fire missions are laid in well in advance of the Start).
"Historical" should take in three issues:

First is whether the opposing forces are constructed in terms of unit designations, purpose and their strengths recorded in history.

Second is whether the the at start unit dispositions are the same as when the battle started according to its history.

Third is whether the historical decision is among the possibilities of those a human player's and AI's strategy could reach.

Once the battle is starts, the progress should reflect the in battle decisions a human player or the AI makes depending on the circumstance it finds itself at that time. If the AI is constrained to operating exactly as the opponent did in the historical situation, playing CO2 would end up tfhe equivalent of a boxer punching a body bag, worthwhile at first but eventually a pretty boring exercise until the real boxing event takes place.

I think Paul's perspective takes into account the first three steps rather well.
 
Joined
Jun 5, 2022
Messages
34
Points
8
Age
54
Location
England
Well, I'm having real trouble devising an actual plan of action for this one. I know now why Generals hold the rank they do. I have a general idea of what I want to achieve but the specifics are a real headache. The more I think about things the more I find myself second guessing myself. I've annotated so many maps at this point that I can't see the wood for the trees.

I think I may have to just deal with the essentials at first and re-plan from there as things take shape. I had hoped to have a 'grand plan' for the entire battle, but I think it may be beyond me.

Part of me thinks it's best to fall back from the offset to better enable my forces to plug the gaps in the line, fall back to the few main objectives at St. Vith, and in the west/Southwest and defend from there. Then I second guess myself and start to plan a more aggressive strategy which tries to push the enemy back North and South in a kind of dual encirclement. But that involves splitting my forces and leaving the centre vulnerable. Maybe I'm just overthinking it.

Anyway, I'll go back to the maps again and plan a more general, overall strategy I think. I can maybe re-plan the details as things develop and more intel on the enemy becomes available.

Thought for today: War is hard

Edit: I've made a definite plan. I'll be posting it later today :0)
 
Last edited:
Joined
Jun 5, 2022
Messages
34
Points
8
Age
54
Location
England
So here's what I have, for what it's worth. The way I see it, it can't be any worse than the way I used to fight these battles, namely, just wing it.

First off, apologies for the messy first map here. It's my plan for the North, St. Vith.

4a plan troop movements North.png

I'm not entirely sure about pulling the Artillery back, but I think abandoning the objective next to it and moving my units there closer to St. Vith to aid in it's defence isn't going to be a huge mistake at least. The objective they're currently holding is worth 1 VP whereas St. Vith simply needs to be defended, never mind the VPs.

The groups of units I'm thinking of pulling back over the bridges are racked with fatigue and one of them is in serious danger of encirclement. Apart from this I'd like to get some units closer to St. Vith. I'm quite worried about getting overrun with enemy reinforcements before the battle even really gets going.

Also, something I didn't mark on the map there due to lack of space as much as anything is that I'm going to move the 2 Engineer units currently close to St. Vith over to the two bridges East of St. Vith and give them a 'Deny Crossing' order in an attempt to slow down any enemy units that might try to cross there.

The next two screenshots show my plans for the mass of units in the central region of the map.

4b plan West objectives.png

And here's what I plan to do with them.

4c plan West Troop movements.png

The more I look at this, the more I think it's quite risky. It feels a bit like I'm abandoning St. Vith to it's fate but there are a lot of quite strong enemy units to the South and I feel like I need to at least head in that direction. I may actually end up splitting those forces in the centre of the map; some to stay put and some to follow the directions on the map above. Maybe that's a bit more sensible. I really shouldn't leave the area completely devoid of a friendly presence anyway.

I think this next screenshot highlights these worries quite nicely.

4d plan south troop movements.png

The timing is likely to be key to success or failure in this area I think. I was hoping to perform a delayed defence with the central groups of units gradually pulling them back to the objectives in the West and further south to aid the units in the far South. I know CO2 has a specific order to do this and I've been impressed at how well it works when I used it previously. But if they delay too long then there's a risk of leaving the units in the South to fend for themselves. I may have to move some of the units directly South straight away leaving the others to head off West and then South to the objectives in the West.

Anyway, it's a plan of sorts.

Good luck, and have fun.
 
Joined
Jun 5, 2022
Messages
34
Points
8
Age
54
Location
England
So I'm at the stage of issuing actual orders now. I more or less stuck to the plan in the North apart from making better use of Battalions currently occupying objectives in the very far East, and I decided to move the group of Artillery further west. Here are the orders for the North then.

5a orders North Pre-game.png

It basically amounts to moving almost everything a little closer to St. Vith, and attempting to Withdraw the units that were in danger of encirclement and/or extremely fatigued. I also move a few Engineer units to the bridges and gave orders to some(not all) to 'Deny Crossing;. I think that means they'll begin priming it. I know it takes a while before it's completely primed though so my own forces should be ok to cross. I'll have to look once again at the manual to see what actually causes it to trigger/blow. I know about priming and such but it occurs that I don't remember what causes it to actually blow.

Here's the Engineering orders for the North then.

5d orders Engineers 0530 Pre-Game.png

In the centre my actual orders didn't follow the plan at all. I decided upon beginning to issue those orders that it amount to leaving areas both North and South vulnerable to enemy forces pushing through gaps etc... I decided to attempt to reinforce the North with a few Battalions, and likewise the South with others. There are units left in the centre areas but not many.

5b orders Centre 0530 Pre-Game.png

There are also 3 Engineer units in the centre that are already positioned on bridges. I've given orders for 2 of them to 'Deny Crossing' while leaving one as it is.

5e orders Engineers Pre-Game.png

In the South, I've not needed too issue many orders since there aren't that many of our forces there anyway. I've just tried to consolidate what units we do have while bringing those extra Battalions down from the central areas. As I said above, I'm not going to go with my original plan to move forces West to the main objectives there just yet until I have a better idea of the situation once a bit of time has passed. They're very much needed elsewhere at the moment.

5c orders South 0530 Pre-Game.png

There's only 1 Engineer unit in this area and it's bogged down on the main highway at the moment so I'm going to attempt to 'Withdraw' it further West nearer the river for the time-being. I really hope those troops further North don't get too held up or we'll be in trouble!

5f orders Engineers Pre-Game.png

That's it for the orders. I'll be back when play begins.

Good luck, have fun.
 
Joined
Jun 5, 2022
Messages
34
Points
8
Age
54
Location
England
...And I've just had to redo all the orders except those in the North because I was saving the screenshots but not the game itself!

Anyway, now I just have to muster the courage to kick-off.
 
Joined
Jun 5, 2022
Messages
34
Points
8
Age
54
Location
England
The battle has been fought now so here's the report.

First off, I ended up sticking to my plans as written in both the North and South but decided when the battle started to move some of the central forces to the North and South respectively to aid the beleaguered troops there. I think this may actually have been my biggest mistake in the end. If I had stuck to my original plan to use a 'Delayed defence' while moving them gradually back West/South onto the two main objectives there things might've turned out a little more in my favour. As it was I had to settle for a Minor Victory.

So in the North things went quite well. The enemy seemed to be very slow to advance in this area and I never really seemed to be in any danger of losing St. Vith at all. In fact the enemy didn't even get near it throughout the entire battle. The two bridges I primed weren't in any danger of being assaulted by the enemy either and I wonder if I should have bothered doing that at all.

This is the situation in the North at 1300 hrs on Day 1 then. I was pleased with this. My forces have everything well under control at this point and there wasn't really anything that I was worried about. The North turned out to be a relatively stress-free area throughout the battle all told.

6a D1 1300hrs North.png

In the central areas the enemy was, once again, a little slow to act I thought. They didn't really seem to want to push my forces back or attempt anything too risky at all, unlike in the South which certainly had my stress levels rising by the minute.

The centre at 1300 hrs on Day 1.

6a D1 1300 Centre.png

And the South at the same time.

6a D1 1300 South.png

Even though I sent the first couple of reinforcements through to meet the enemy heading in from the East towards St. Vith, I had that Northern area under control and so was able to send any further reinforcements on the long, long trek South to aid my very limited forces there. As I said earlier, I really wish I'd stuck to my original plan(more or less) and defended back towards the objectives in the West, and then I would have had sufficient forces in those more Southerly areas for when the enemy build up in the South really kicked off.

By 1900 hrs on Day 1 the battle hots up a little in the North, but is still well under control.

6b D1 1900hrs North.png

In the centre at 1900 hrs, I felt kind of lucky really. I had expected more fierce fighting from the enemy forces but this didn't materialise really, which again makes me wish I'd stuck to the initial plan here. You can also see the reinforcements passing by in the far West on their long trek South. The gold crosses show that there were some battles kicking off though.

6b D1 1900hrs Centre.png

In the South at the same time the enemy is really starting to push quite hard. Luckily the first group of reinforcements were beginning to arrive from the North. I can't tell you how stressful this was wondering if they were going to make it in time.

6b D1 1900hrs South.png

As Midnight arrives on Day 2, the North is in much the same situation as it's been all battle. We still have it very much under control and the enemy seems to be having real trouble making any forward progress. I've zoomed out a little this time so we can see the reinforcements continuing to push South.

6c D2 Midnight North.png

The centre hasn't changed much either. The enemy isn't causing me too many concerns here. I've started to move some of my troops towards the South there since there's nothing too serious happening in this central area to warrant keeping them here.

6c D2 Midnight Centre.png

It's a very different story in the far South around the Wiltz objectives though. The enemy has managed to push all the way to those areas and is causing me my only real headache in the whole battle. My reinforcements have been steadily arriving from the North, but are only just in time and they've been travelling through the evening and into the night to get there. In the end they do make it in time but only just. I really should have moved the central forces South earlier and then I wouldn't have had to push the reinforcements such a huge distance like that. Or at least, not soo urgently anyway.

Here's the situation in the South at Midnight.

6c D2 Midnight South.png

The scrum of enemy forces and the rush for our chaps to get there is shown quite nicely here. A very dangerous situation.

When the battle ends at 0800 hrs on Day 2, the massive amount of enemy forces in the North becomes more obvious. We seemed to do well here and held them off all through the battle. Again, our reinforcements are seen making their way South even at this late stage of proceedings.

7a D2 end of battle North.png

In the South we are really in trouble judging by the massive build up of enemy units. Our reinforcements saved us there I think but if the battle had continued much longer we'd have had a job holding them for too much longer.

Here's the end of the battle in the South.

7a D2 end of battle South zoomed in.png

Also, I'd completely forgotten that we were supposed to be getting our main HQ out through the exit at the Wiltz objectives in the South, but I'd left it in the far North. Oh well.

Anyway. Here's the victory screen.

7a Victory screen.png

n.b. : Since I had the presence of mind to save the game after all the orders were done but before I started the game running, I shall be able to alter the central units orders to adhere to my original plans. I'll be leaving the North and South orders as is, and we'll see what would've happened if I'd stuck to that original plan. Should be very interesting I think. I'll put that alternative run in a new thread I think.

Hope you enjoyed the report. I certainly enjoyed the battle.

Good luck. Have fun.
 
Last edited:
Top