Welcome to the LnLP Forums and Resource Area

We have updated our forums to the latest version. If you had an account you should be able to log in and use it as before. If not please create an account and we look forward to having you as a member.

Question about aspects of movement commands

BarryJI

Member
Joined
Jun 19, 2020
Messages
22
Points
3
Age
63
Location
Los Angeles
I'm making good progress in "All-American Over Nijmegen" but having secured the bridges, I must move XXX Corps north with dispatch. Here are my questions. I think I will await your responses before I proceed with the last phase of the assault:

- Does a "Move" order, using column formation for a motorised force on a highway, ensure much faster progress, when no contact with the enemy is anticipated, than Attack? I assume it does.

- Should all transitions from Move to Attack be preceded by a Reorg order?

- I'll need to attack over Honighutje Bridge because there is still a minor enemy presence nearby, skirmishing with the paratroopers who took the bridge and un-primed it. I want to get the follow-on, heavy, motorised Welsh Guards over the bridge as fast as possible and whereas I don't want them to deliberately evade the enemy forces present and I don't mind if they smack them about a bit, I do not want their momentum to be slowed. So, is it most efficient to attack across a bridge and along roads in column formation and should I set Aggro to min or max in order to push these units across the bridge and on their way north as soon as possible?

- Once past the bridge, I want this force to skirt the fairly low-intensity battle taking place for Somerchen, so I think I will divert them from Hell's Highway and have them enter Nijmegen along a more minor road, accepting slower progress as a trade-off for less friction. However, once in Nijmegen I want them to avoid getting tangled up with the remainder of the Axis defenders and get across the northwestern rail bridge ASAP. I am going to hand-plot their route to avoid known enemy locations but what Aggro settings ensure fastest progress if glancing contact is made? Is this the right time to check the "Bypass" box in the Edit Task menu and how should the "Attack" option be set?

Thank you for putting up with my detailed questions. This is the best war game I've played in 20 years of war gaming and for me it's worthy of all the time and attention it takes to play it well. I've even read the manual twice! Many thanks, as always, for your support.
 

john connor

Member
Joined
Oct 22, 2014
Messages
2,488
Points
63
Age
60
Location
Brussels
1. Yes. The Attack (Assault) process is specifically to put the formation into an assault posture and organisation and involves a kind of re-org, at a forming-up-point (automatically set by the AI, unless you hold shift-Assault and place it deliberately as the last waypoint before your Assault marker). It's much slower than Move, but obviously safer if you know you will come into contact, and much more powerful, in terms of impact, as it's specifically for assaulting targets. If you give such an order at Bn level, for example (recommended) then if there are mortars the AI will hold them back and have them provide support for the Assault. Use Move if you want to get somewhere quickly and are happy with the units moving in a non-deployed formation. Assault is a deployed formation. Units are vulnerable in Move formation, so you can use some unit to scout ahead if you like.
2. No need for you to do a re-org. I actually never use the re-org command. I wonder what it's for? Maybe someone more knowledgeable can chime in. As stated above, if you order an Assault then the AI will do all the re-orging necessary (you will see the re-org graphic appear on the units counters at the last waypoint before the Assault proper starts). Be nice to know under what circs a 're-org' command would be useful.
3. The enemy 'skirmisher' units will slow everything down until you truly deal with them. Assign some unit to Assault them. To try to get units as much as possible to ignore them use aggro on min, max rate of fire, max or normal losses. Low losses mean contact and losses will halt them. But, as I said, best to deal with them. Don't use 'avoidance' or 'bypass' if you don't want them to pick a route that may be very circuitous.
4. As said above, 'bypass' will enable them to halt and re-think on contact (which can take quite a bit of time), then come up with a route that goes nowhere near the threat. Avoidance does similar, I think. If you hand plot a route choose fastest and shortest. If you don't choose 'shortest' (which means shortest between your hand-plotted waypoints) then the AI may choose some other route that it thinks is quicker, or more covered, or safer etc (depending which option you choose) in order to get to the final destination. To keep units moving as much as poss you want them to stop to fire at contacts less (low aggro) and when they do you want it to be most effective (max fire rate). If they take losses you want them to ignore them (max losses).

Hope this is all more or less accurate....

Enjoy! If you play the big 'From the Meuse to the Rhine' scenario, with Arnhem and Nijmegan on the same map, then this fight at Nijmegan becomes very important for your troops up in Arnhem. I have found it relatively possible to get a bridgehead of sorts at Nijmegan, but getting XXX Corps across it and the roads across the 'island' in time to do anything for the Red Berets is a different matter...

John
 
Joined
Oct 20, 2014
Messages
1,185
Points
63
Age
76
Location
Livonia, MI (Detroit-area suburb)
I'm making good progress in "All-American Over Nijmegen" but having secured the bridges, I must move XXX Corps north with dispatch. Here are my questions. I think I will await your responses before I proceed with the last phase of the assault:

- Does a "Move" order, using column formation for a motorised force on a highway, ensure much faster progress, when no contact with the enemy is anticipated, than Attack? I assume it does.

Yes, a unit makes its fastest progress with a "move" order, particularly if the path is along the highway (quickest path).

There's more jeopardy with the order, because the force is not organized for an efficient defense if attacked along the route.

- Should all transitions from Move to Attack be preceded by a Reorg order?[\quote]

The unit automatically reorganizes for an attack when in a formation not suitable for attack (e.g. transition from move to attack). The only benefit of issuing a Reorg order is assigning the location (Form Up Point -- FUP) where you want the unit to reorganize for the attack.

- I'll need to attack over Honighutje Bridge because there is still a minor enemy presence nearby, skirmishing with the paratroopers who took the bridge and un-primed it. I want to get the follow-on, heavy, motorised Welsh Guards over the bridge as fast as possible and whereas I don't want them to deliberately evade the enemy forces present and I don't mind if they smack them about a bit, I do not want their momentum to be slowed. So, is it most efficient to attack across a bridge and along roads in column formation and should I set Aggro to min or max in order to push these units across the bridge and on their way north as soon as possible?

When faced with a decision to reinforce a defending force threatening a crossing or to push the whole force across the bridge, I'd dispatch a cadre of the marching force (company or battalion) to attack the defending force while allowing the remaining force to move past the area.

Setting Aggro at a high level encourages the force to pursue its assigned mission under more adverse conditions.

- Once past the bridge, I want this force to skirt the fairly low-intensity battle taking place for Somerchen, so I think I will divert them from Hell's Highway and have them enter Nijmegen along a more minor road, accepting slower progress as a trade-off for less friction. However, once in Nijmegen I want them to avoid getting tangled up with the remainder of the Axis defenders and get across the northwestern rail bridge ASAP. I am going to hand-plot their route to avoid known enemy locations but what Aggro settings ensure fastest progress if glancing contact is made? Is this the right time to check the "Bypass" box in the Edit Task menu and how should the "Attack" option be set?

The Bypass order encourages the friendly force to go around disruptive enemy units if possible.

Thank you for putting up with my detailed questions. This is the best war game I've played in 20 years of war gaming and for me it's worthy of all the time and attention it takes to play it well. I've even read the manual twice! Many thanks, as always, for your support.

I'd suggest exploring several options from the same timepoint. You can create a save name that delineates a different order track.

My convention is to use the format "All-American Over Nijmegen D2-1200" to designate the time of the save. To this, I'd append a letter "All-American Over Nijmegen D2-1200a", "-- b", "-- c" etc. to delineate different order tracks. Keeping track of the progress along the different tracks allows me to experiment with different tactics from the same point to see which work best for the operation.
 

john connor

Member
Joined
Oct 22, 2014
Messages
2,488
Points
63
Age
60
Location
Brussels
You say, Jim, that

'The unit automatically reorganizes for an attack when in a formation not suitable for attack (e.g. transition from move to attack). The only benefit of issuing a Reorg order is assigning the location (Form Up Point -- FUP) where you want the unit to reorganize for the attack.'

But that automatically happens at the point where you place the waypoint immediately before the Assault, no? Without you having to pick 're-org'. What would doing a separate 're-org' order achieve (I ask because I'm unsure when you're meant to use this order, as I said above.)? It would delay things, I assume, because you'd then have to issue an assault order after that.
 

john connor

Member
Joined
Oct 22, 2014
Messages
2,488
Points
63
Age
60
Location
Brussels
Setting Aggro at a high level encourages the force to pursue its assigned mission under more adverse conditions.

Are you sure about this, Jim? I thought - from a reply Dave gave me long in the past - that setting aggro to max made units more likely to engage incidental threats, which is not what you want if you want them to push on. True, once they reach the assigned mission it will make them more determined to engage there as well. But if you want them to ignore threats along the way i always thought 'low aggro' was the right order? As I said, I did ask Dave about this, but it was, I admit, perhaps eight years ago, so my memory could easily be wrong...
 

BarryJI

Member
Joined
Jun 19, 2020
Messages
22
Points
3
Age
63
Location
Los Angeles
Very useful discussion. The ambiguity here appears to be: does Aggro at max cause units to seek engagement, delaying them while they engage or does it make them push through, maintaining their forward momentum?
 

john connor

Member
Joined
Oct 22, 2014
Messages
2,488
Points
63
Age
60
Location
Brussels
Mmm. Though, to be brutally honest about the game and these kind of fine tuning options, I haven't ever noticed a difference in practice. In practice, how it seems to me is that if you have a formation moving in column, (on a Move command, non-deployed), then any enemy unit in its path or near (within engagement range, including with indirect fires) will stop it and mess up its plan until you assign some unit to go off and deal with the enemy, and that is what happens regardless of the aggro, Rof and losses settings. If you encounter enemy units whilst in the Assault phase of an assault plan, whilst deployed, then those units will be dealt with en route, again regardless of the fine tunings. So, I would say it's best when using Move - as both Jim and I suggested - to detach units to deal with opposition in order to be able to progress as smoothly as possible towards your destination. The alternative is to tick 'bypass', as we said, in which case the formation will stop, think, and re-plan the route around the road hump. But that might actually take longer than dealing with the 'skirmisher' unit, and is not guaranteed to not lead into yet another road hump, depending on the intel situation.

If you use Move with 'attack' ticked then the AI itself will often put in some sort of attack when it runs into opposition, and sometimes it is very good at this, sending off a unit exactly as you might have done manually. Sometimes it takes ages to get round to this, sometimes it goes for overkill and the whole formation attacks the obstacle. But sometimes it's perfect. It may be that the fine tuning options affect how it goes about this, but I'm not sure how. And again, I haven't actually noticed any differences, no matter which fine tuning boxes I've selected. Doesn't mean there aren't any differences.
 
Last edited:
Joined
Oct 20, 2014
Messages
1,185
Points
63
Age
76
Location
Livonia, MI (Detroit-area suburb)
You say, Jim, that

'The unit automatically reorganizes for an attack when in a formation not suitable for attack (e.g. transition from move to attack). The only benefit of issuing a Reorg order is assigning the location (Form Up Point -- FUP) where you want the unit to reorganize for the attack.'

But that automatically happens at the point where you place the waypoint immediately before the Assault, no? Without you having to pick 're-org'. What would doing a separate 're-org' order achieve (I ask because I'm unsure when you're meant to use this order, as I said above.)? It would delay things, I assume, because you'd then have to issue an assault order after that.
I addressed that.

It happens either by allowing the AI to choose the FUP, or by the person issuing the order choosing the FUP and then issuing the attack order from that position.

The difference is whether one trusts the AI's FUP selection, or has a better option.

In this scenario, I consider the initial attack on the Grave bridge by the 2 BN of the 504 PIR a key to the game. My most successful attack was by issuing orders to establish a BN mortar fire base for a bombardment of security forces and supplementing that with cover fire from E Co of the 504 BN from a defensive position in range of the security forces, moving remaining assets from the 2BN quickly from its drop zone to a location at the crossroads just out of sight of forces defending the Grave bridge and establishing a FUP for the "secure crossing" order there.

Then I set a cover fire and bombardment order for the time it takes for the attacking force to move from the FUP to contact with the defending forces, usually suppressing the blowing of the bridge and securing that crossing.
 
Joined
Oct 20, 2014
Messages
1,185
Points
63
Age
76
Location
Livonia, MI (Detroit-area suburb)
Setting Aggro at a high level encourages the force to pursue its assigned mission under more adverse conditions.

Are you sure about this, Jim? I thought - from a reply Dave gave me long in the past - that setting aggro to max made units more likely to engage incidental threats, which is not what you want if you want them to push on. True, once they reach the assigned mission it will make them more determined to engage there as well. But if you want them to ignore threats along the way i always thought 'low aggro' was the right order? As I said, I did ask Dave about this, but it was, I admit, perhaps eight years ago, so my memory could easily be wrong...
High aggro could include suppressing threats to pursue a mission.

If you don't want to engage forces along the way while maintaining forward progress, the "bypass" option is the right choice.
 

BarryJI

Member
Joined
Jun 19, 2020
Messages
22
Points
3
Age
63
Location
Los Angeles
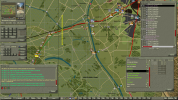
Well here's a visual aid. D4, 07:01 and my first Bn of Welsh Guards is pushing up Hell's Highway currently under the move order selected. I want them to haul a$$ through the token resistance at the bridge then offset to the left, avoiding contact further up the highway and entering Nijmegen via minor roads to the the west, hopefully bypassing defenders inside the city and getting across the rail bridge (off-map to the top right). Given the need for speed I wonder if I should give them an Attack order with column formation so that they stick to the roads and don't bog down? I think I'll use Fastest/Quickest and try Aggro at max. I wonder if I should check “Bypass” in the hope of reducing prolonged contact further.

upload_2020-10-25_16-23-41.png
 
Last edited:

john connor

Member
Joined
Oct 22, 2014
Messages
2,488
Points
63
Age
60
Location
Brussels
That doesn't look like token resistance to me. I can't see too well, because you've got the counter scaling on, but there's a Bn there, no? At least an HQ, a company, arty and something else? I would deal with them properly. Your paras at the bridge should have cleared them out. There's no chance of crossing a bridge smoothly with a force like that so near, I think.
 
Joined
Oct 20, 2014
Messages
1,185
Points
63
Age
76
Location
Livonia, MI (Detroit-area suburb)
Well here's a visual aid. D4, 07:01 and my first Bn of Welsh Guards is pushing up Hell's Highway currently under the move order selected. I want them to haul a$$ through the token resistance at the bridge then offset to the left, avoiding contact further up the highway and entering Nijmegen via minor roads to the the west, hopefully bypassing defenders inside the city and getting across the rail bridge (off-map to the top right). Given the need for speed I wonder if I should give them an Attack order with column formation so that they stick to the roads and don't bog down? I think I'll use Fastest/Quickest and try Aggro at max. I wonder if I should check “Bypass” in the hope of reducing prolonged contact further.

View attachment 8738
Assuming you can beat back the enemy resistance, I'd suggest you use the tools menu to assess which kind of a route you want the battalion to take once it has crossed the bridge (use teh "force" routing options).

Check out Page 162 of the game manual.for an explanation of the various routes.

If you use the tools, it will show you the various routes the force would take for the kind of movement action you desire. Use the "MOT option, since the guards is largely a motorized force.

See page 162 of the game manual for a description of route criteria used on the tool menu.
 

BarryJI

Member
Joined
Jun 19, 2020
Messages
22
Points
3
Age
63
Location
Los Angeles
Fair enough, Tim; detaching companies to chase away enemy units that compromise my "ownership" of an objective I've taken is a weak point of mine. However, those Axis units across the bridge are pretty much exhausted and virtually non-combat effective. But you're right, I still have to dig them out if I want credit for the objective.

I love the route tools. I have chosen to hand-plot a route for the Welsh Guards around the skirmishing at Somerchen where I believe I have the upper hand so that I can get them into Nijmegen and across the rail bridge ASAP. If I had used an "avoidance" route plotted by the superb AI plus "Bypass" it might have accomplished the same thing but faster. I will do that as the last wave of reinforcements launches, using the route tools to anticipate what precise route the AI might choose.
 

BarryJI

Member
Joined
Jun 19, 2020
Messages
22
Points
3
Age
63
Location
Los Angeles
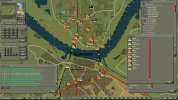
Broke through across the river north of Nijmegen overnight on Day 4/5 but clearing the bridgehead at the road bridge to the east was a hell of a fight. Glad I pushed across the rail bridge first and took the middle objective so that I could essentially flank the dense defense of the road bridge. Better to have fought them here in the open than in Nijmegen if I'd waited until morning to attempt the crossing and then find they'd come across the bridges. Now I've got about six hours to push up the road and exit as many units as possible to the north. What a great game. I've never seen AI perform a regiment/battlegroup-style phased attack anything like as well as this AI can in any war game.

upload_2020-10-29_10-5-46.png
 
Top