Welcome to the LnLP Forums and Resource Area

We have updated our forums to the latest version. If you had an account you should be able to log in and use it as before. If not please create an account and we look forward to having you as a member.

Greyhound Dash AAR

Joined
Jun 5, 2022
Messages
34
Points
8
Age
54
Location
England
I'm going to be posting this one piecemeal so I have a better and more detailed record of what happens. These first few hours were played while I was having a few beers last night so apologies for any ridiculous decisions I may have made. There was a strange issue that I didn't quite understand at the time when 4 or 5 'Red Flash' messages appeared all at once saying it couldn't move the Battalion in question. It said something about the 'line', and of course I didn't screenshot it(of course). Anyway, I didn't understand what it meant at the time. I put it down to a beer-drinking issue!

Anyway, the first thing I decide to do is to try to rescue the lone Artillery unit at the far south of the map. I've played this scenario once before and tried to move it West to join the Engineer unit but it just got swamped by the enemy units and died so this time I thought I'd try moving it North. Same thing happened though and it simply got trounced by the enemy again. I'm beginning to think there's actually no way to save it.

1 - Attempting to move Artillery(reinforcemnets at 10.30am).png
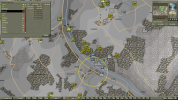
Here it is as I attempt to get it moving
This also shows that we're due to receive a whole load of Armour at about 10.30ish. It actually arrived a bit later than that in the end.

Here we see just what I'd expected with that unit having a really, really bad day.

2 - Artillery never had a chance.png
I wonder if this unit can escape at all?

The reinforcements arrive sometime after 11.00am I think. I didn't notice them at first due to my watching the Artillery unit in the South. I think I was still hoping for a miracle but as we see in this following screenshot, it's just about dead at this point. I'm actually wondering as I write this if it would've been better not to try to move it at all. Maybe I should try just ignoring it completely and hope the enemy wanders off and leaves it alone.

3 - Reinforcements have arrived.png
Reinforcements arrive. I think I counted 14 units in all. You can see the Artillery unit at 'zero' combat power now.

My initial plan of action was to simply attack with any units South through the main objectives along the East with some units and down through the centre with others. This may not be much of a plan but I know from playing it once before all the reinforcements arrive at the North of the map so there doesn't seem to be too much of a problem with this simple suck-it-and-see approach here I think.

I mentioned above that one of the battalions didn't move and I received a 'Red Flash' message(several in a row) about the 'line' being a problem or something. Looking at the following screenshot now I can see that there are movement arrows effectively pointing at itself. Maybe this was the problem. It probably was a beer-related issue in the end though. It's not actually too serious an issue since they were to Attack through to the objective at Erezee to the East of the river.

4 - One of my Battalions refuses to move.png One Battalion moves to Attack while the other gets drunk and refuses to move!
I love watching Attacks being launched in all it's close-up glory. Here's a beautiful shot of the sober battalion in all it's furious loveliness.

5 - The other Battalion engages enemy at Soy.png
Note the Artillery is leading the charge... It's still a thing of beauty to behold though.
This is one of the things I love about this game. You could almost imagine this being an overhead shot from drone footage or something. It's just beautiful.

That's as far as this battle has got so far. I'll keep you posted as it proceeds. Until next time then.

 
Last edited:
Joined
Jun 5, 2022
Messages
34
Points
8
Age
54
Location
England
Something I've just noticed is that I Attacked with those two armoured Battalions South to the first objectives respectively and then on to a second position. This means the FUP will be bang on the first objectives where there are likely to be enemies. This is of course a really bad thing. I must watch that in future. Maybe the way to do it is to Attack through to the first objective only, then the FUP will be much better positioned.

Edit: This could also explain why the Artillery ended up out in front like that.
 
Last edited:
Joined
Jun 5, 2022
Messages
34
Points
8
Age
54
Location
England
Continuing then, I decide to attack through to Hotton instead. It's a more valuable objective and is more central rather than being stuck out East beyond the river. There are reinforcements arriving East of that objective on Day 2 as well, 5 units of Armour but nevertheless I'd rather stick to a more centralised position for the moment.

6 - Attacking through to Hutton instead.png
Covered path to Hotton

7 - On the move(covered route).png
On the move

We're surprised by a lone Armoured company on route to Hotton but after a relatively minor exchange of fire it slides out of our way and the chaps continue on their way happily enough.

8 - Encountering a lone emeny unit on route.png
A lone PzJg Battalion causes a minor delay in the dead of night
I realise now that TF Orr is a Recon. Battalion so I probably should have stood off a little from the objective and waited for reinforcements rather than simply steaming straight in without thinking. Another lesson learnt then so that's a positive. They're at the objective now though so I'll have to think about withdrawing them again ASAP or they'll almost certainly get trounced. Dawn isn't too far away either so I'll be lucky not to get overwhelmed there now. Oh well. Live and learn!

10 - The chaps encounter Infantry and Engineers.png
Dawn will probably reveal a whole shebang of enemy units rather than just the two we see here at the moment...
The only other issue I'm having is with the Artillery. I expected it to stand off as it moved in towards Hotton but as we can see from this last screenshot it just waltzed straight into the fray and butted up close to the two enemy units(the Infantry unit and the Engineers). I thought it may be because I hadn't ticked the Direct support only button when I attacked into Hotton but I'm pretty sure I did. I confess I'm a little confused by the movements of the Artillery units at times. As it's positioned here it won't be able to engage the enemy due to it's minimum range. I don't understand Artillery at all.

11 - Artillery moves close-in the enemy units!.png
Artillery decides the best course of action is to position itself right next to the enemy units negating it's ability to bombard!!??
I'm thinking it's because it's still dark at this point? Seems unlikely though. I'd have thought it should hang back no-matter-what ready to engage wherever it's needed. I mean it's range is massive so I don't understand it moving into Hotton at all even though it's unit's orders are to attack Hotton, surely it's job is still to hang back a little? Anyway, I'm relatively new to wargames as a whole and haven't been playing CO2 very long either so it's certainly something I'm doing, or maybe not doing. I'm just not sure what.

Until next time then. Have fun.
 
Last edited:
Joined
Jun 5, 2022
Messages
34
Points
8
Age
54
Location
England
Reinforcements arrive East of the river and I send them straight over to Soy to aid the chaps there for the time-being. I feel like I should have kept them at Erezee though really. I may have to adjust that Attack order to Soy. Just seems to make more sense not to bypass Erezee in the first place. There is a large contingent of Infantry on it's way soon too.

This was the initial plan for Kane's Battalion.

13 - Heading straight for Soy.png
Was initially planning to Attack into Soy to aid the others already fighting there

But having thought about it I'm going to get them to Defend at Erezee.

18 - Adjusted Kane's attack order to Erezee.png
I'm still second guessing myself here though. It still seems to make more sense this way though
It's not too long before an entire Division of Infantry arrive from the NorthWest, 5,554 troops! I decide to get them all moving straight away.

15 - Initial positioning of the Infantry.png

This didn't go to plan at all when for some reason I still don't understand, this happened,

16 - 1st, 2nd & 3rd Battalions of 334th Infantry abandon their missions.png
The 1st, 2nd & 3rd Battalions of the 334th Infantry decide they can't find a route through!

Now the thing that confuses me here is that I distinctly remember using the Tool window/buttons to see which of the options would be best to plot their route so there doesn't seem to be an obvious reason why they then decide that can't take the planned route after all. Anyway, I've decided to leave them for the moment and assess the situation on as it is on the map when the other Battalions have finished moving.

So this is the situation as another Infantry unit arrives, the 333rd Infantry HQ this time. 17 - More reinforcements, more Infantry.png
The 333rd Infantry HQ arrives in the NorthWest as the other Battalions move into their respective positions(except the 334th of course... tsk...!)
So that's where we are at the moment. I'll see about getting those darned 334th Infantry moving too now. How annoying!
 
Joined
Jun 5, 2022
Messages
34
Points
8
Age
54
Location
England
19 - 334th Battalion Bunkers down instead of moving.png
334th continues to do absolutely nothing

Nope. They decide to bunker down now. Well at least that's a different excuse this time. Anyway, onward...

I'm getting a little edgy about leaving the enemy sitting staring at my chaps at Soy so I decide to order a small, surprise attack with the idea to simply get them to stand off a little further away from the objective. I don't want Soy to turn into the usual cat-and-mouse situation that so often happens with my battles in that the enemy just sits waiting by an objective and gradually chips away at my units until the end of the battle and then dashes in and snatches it right at the end. That's very annoying. I'm going all out to try to 'destroy the enemy' in this battle. If I'm going to draw or lose then I'm taking as many of them with me as possible.

All this resulted in the enemy backing off a little way, but I'm a bit happier with my position now. If I could just get that damned 334th Infantry moving I'd be able to clear the enemy out of here completely I think.

21 - An uneasy stand-off at Soy.png
A uneasy standoff

The Paras arrive shortly after this, at which point I decide 'once again' to get the Infantry moving. I really need them to do as ordered at this point. There's an awful lot of men just sitting there absolutely refusing to follow orders. So I decide to just move two of the three Battalions this time and leave the 1st Battalion where it is. I'm also going to send them down the main highway to the town of Marche-en-famenne this time to make sure there's no nonsense about not being able to find a route through, and then on further to the East so that they'll be in a better position to meet the enemy if need be. I'm getting concerned that there's a large enemy presence at the East of the river, and that's on top of their presence at Soy. Admittedly we have Soy under control at the moment, but I'm afraid that a big push from their units around Erezee could mess with all my plans.

22 - The Paras arrive.png
The Paras arrive
Now let's see if we can move the Infantry this time!

23 - Once again, I attempt to get the 334th Battalion moving.png

We'll see what happens next time then. Good luck and God Bless.
 
Last edited:

Arkadiy

Member
Joined
Nov 9, 2020
Messages
40
Points
8
Location
USA
Artillery moving where you didn’t want it wasn’t because of the “direct support only” - that option just limits who can request support as far as I understand. I usually move arty separately just to avoid incidents like this.
This behavior may not desirable, but it‘s not clear what is. At least in US army for arty there was ”support” vs “attach“ concepts (I want to say Germans had something even more elaborate, and RKKA did just as much). Support is pretty straightforward - you have your arty regiment + reinforcements and they would get direct comms with the infanary regiment the support, yet the command and control is still centralized. Whereas attachment would happen when a supported unit would get a mission that takes it away from the organic division (say, an infantry regiment gets attached to a armored division combat command). In the first case, the order to displace and go elsewhere comes from the divarty, in the second case, it’s the detachment‘s CO.
Now back to the game - there is no way to enforce that distinction (not that I know of), so what does that mean? I can assume, artillery is treated the same way as any other unit that‘s attached and receives appropriate orders from the ad-how formation CO. And given that the CO has to maintain control over the arty now, it would not be unreasonable that it’s treated similar to other attached indirect units such as mortars - just at a much longer distance. And at the end of the attack the arty would would to displace to be close to its new co.
I have to say - I don’t even think that is what’s happening now and what you see is probably one of the things the developer is currently addressing. But arguably, it’s not clear what the desired behavior should be (aside from not trying to act as a unit of the line)
 
Last edited:
Joined
Jun 5, 2022
Messages
34
Points
8
Age
54
Location
England
Yes, Artillery is a little confusing to me at the best of times. I remember having good results with it when I played the Return to st. Vith scenario where I routinely just gave all the long-range Artillery a 'Defend in place' order so it'd 'deploy/on call' but then at some point I seem to have got it into my head that if I choose the 'Direct support only' option then it should stand-off 'away' from the rest of it's unit so it'd able to help them if needed. That doesn't seem to be happening though. But I think you're right anyway due to Artillery working quite well before I messed with the 'Direct support only' option. Until I understand it better I think the best option is to leave it alone and let the AI control it completely.

Thanks for the info. Much appreciated.
 
Joined
Oct 20, 2014
Messages
1,185
Points
63
Age
76
Location
Livonia, MI (Detroit-area suburb)
Yes, Artillery is a little confusing to me at the best of times. I remember having good results with it when I played the Return to st. Vith scenario where I routinely just gave all the long-range Artillery a 'Defend in place' order so it'd 'deploy/on call' but then at some point I seem to have got it into my head that if I choose the 'Direct support only' option then it should stand-off 'away' from the rest of it's unit so it'd able to help them if needed. That doesn't seem to be happening though. But I think you're right anyway due to Artillery working quite well before I messed with the 'Direct support only' option. Until I understand it better I think the best option is to leave it alone and let the AI control it completely.

Thanks for the info. Much appreciated.
From Page 72 of the Game Manual:

"Change Arty Direct Support Only

"You can restrict a force so that its units capable of bombarding will only fire in support of units carrying out the same order. This is called Arty Direct Support Only. When it is turned off, your artillery, mortar and rocket units may fire in support of any friendly unit.

" Click the Arty Direct Support Only checkbox to turn it on or off

"By default this is on for Attack and Probe and off for all other orders."

Basically, if one wants an artillery unit to support a specific order, it should be attached to the force receiving the order and have the "Direct Support Only" option checked.

If left unchecked, the artillery will fire on enemy positions as determined by criteria built into the game engine.

The changes to artillery being refined in the next update incluide keeping artillery units in an optimum support position rather than moving them toward objectives and altering the criteria for targeting so manual fire is more realistically random based on firing distance, unit training, unit health status and the amount of observation available to aim on indirect fire targets.
 
Joined
Jun 5, 2022
Messages
34
Points
8
Age
54
Location
England
Thanks Jim. I shall experiment and see if I can get a grip on it. Those changes to Artillery you mentioned sound wonderful. I'll look forward to trying those out when they're ready. Thanks for the help.
 
Joined
Jun 5, 2022
Messages
34
Points
8
Age
54
Location
England
Oh. No, I'm still using the standard version. I'll take a look at that tomorrow then. Thanks for that.
 

john connor

Member
Joined
Oct 22, 2014
Messages
2,488
Points
63
Age
60
Location
Brussels
Continuing then, I decide to attack through to Hotton instead. It's a more valuable objective and is more central rather than being stuck out East beyond the river. There are reinforcements arriving East of that objective on Day 2 as well, 5 units of Armour but nevertheless I'd rather stick to a more centralised position for the moment.

View attachment 9360
Covered path to Hotton

View attachment 9361
On the move

We're surprised by a lone Armoured company on route to Hotton but after a relatively minor exchange of fire it slides out of our way and the chaps continue on their way happily enough.

View attachment 9362
A lone PzJg Battalion causes a minor delay in the dead of night
I realise now that TF Orr is a Recon. Battalion so I probably should have stood off a little from the objective and waited for reinforcements rather than simply steaming straight in without thinking. Another lesson learnt then so that's a positive. They're at the objective now though so I'll have to think about withdrawing them again ASAP or they'll almost certainly get trounced. Dawn isn't too far away either so I'll be lucky not to get overwhelmed there now. Oh well. Live and learn!

View attachment 9363
Dawn will probably reveal a whole shebang of enemy units rather than just the two we see here at the moment...
The only other issue I'm having is with the Artillery. I expected it to stand off as it moved in towards Hotton but as we can see from this last screenshot it just waltzed straight into the fray and butted up close to the two enemy units(the Infantry unit and the Engineers). I thought it may be because I hadn't ticked the Direct support only button when I attacked into Hotton but I'm pretty sure I did. I confess I'm a little confused by the movements of the Artillery units at times. As it's positioned here it won't be able to engage the enemy due to it's minimum range. I don't understand Artillery at all.

View attachment 9364
Artillery decides the best course of action is to position itself right next to the enemy units negating it's ability to bombard!!??
I'm thinking it's because it's still dark at this point? Seems unlikely though. I'd have thought it should hang back no-matter-what ready to engage wherever it's needed. I mean it's range is massive so I don't understand it moving into Hotton at all even though it's unit's orders are to attack Hotton, surely it's job is still to hang back a little? Anyway, I'm relatively new to wargames as a whole and haven't been playing CO2 very long either so it's certainly something I'm doing, or maybe not doing. I'm just not sure what.

Until next time then. Have fun.
Did you tick 'basing' for the artillery unit's parent unit for the order that brought it there? If basing was ticked it should base the artillery at a safe distance from the parent formation (as you would have liked), if not it will keep the arty with the parent formation. But even with basing ticked it depends on the control map the AI is reading. Your move into Hotton might well have looked like a kind of infiltration behind enemy lines to the AI, depending on the exact control map situation, and hence it might not have been able to find anywhere deemed safe enough. Night can compound this, of course.
 
Joined
Jun 5, 2022
Messages
34
Points
8
Age
54
Location
England
No I didn't tick that option John. I'm certain I've never actually used the 'basing' option at all. Thanks for the heads-up though. I'll have to try it when I next get the chance.
 
Joined
Jun 5, 2022
Messages
34
Points
8
Age
54
Location
England
On another note, the laptop I was using for this ongoing game refused to switch on this morning so it's looking like it may have to be sent for repair. Unfortunately the games save files were on it and of course I didn't back them up to dropbox so it maybe a few weeks before I can resume normal progress.

In the meantime I've set up a saved games folder on dropbox now so any future games will be safe. I've learnt some new things from this game though so I'll probably be starting a new thread for a new AAR to put some of them into practise.

Good luck, and God bless.
 
Joined
Oct 20, 2014
Messages
1,185
Points
63
Age
76
Location
Livonia, MI (Detroit-area suburb)
I'm going to be posting this one piecemeal so I have a better and more detailed record of what happens. These first few hours were played while I was having a few beers last night so apologies for any ridiculous decisions I may have made. There was a strange issue that I didn't quite understand at the time when 4 or 5 'Red Flash' messages appeared all at once saying it couldn't move the Battalion in question. It said something about the 'line', and of course I didn't screenshot it(of course). Anyway, I didn't understand what it meant at the time. I put it down to a beer-drinking issue!

If your plan is to learn the game as you play, one technique to consider is branching play from saves to create different tactical / strategic options.

The technique I use is loading the game basics and automatically saving it before running any commands. The nomenclature for this scenario would be "Greyhound Dash D1-(at start time) and either (Allies or Axis) to indicate the side being played. (e.g. Greyhound Dash D1-0900 Allies).

From that I craft orders, and when ready to begin combat, record a save as "Greyhound Dash D1-0900a Allies), the "a" designating an order thread from the "at start" time.

During play pause the game at the time I want to issue new orders, write the orders record the save as "Greyhound Dash D1-0938a Allies."

If I proceed from that point and don't like how my side is progressing, I'll go open the previous save (Greyhound Dash D1-0938a Allies( and issue revised orders from that point, labeling them "Greyhound Dash D1-0938b Allies" to designate a new order thread.

in that manner I can review past actions and compare how each may affect the present situation as I proceed.

Though it wouldn't shouldn't be considered as an AAR example for this particular thread (in real war a commander gets one chance at a time, and lives with the results as he / she proceeds), it does help shape decisions when one wants to fight as a "real commander" with all the constraints that commander faced when fighting the selected battle.
 
Joined
Jun 5, 2022
Messages
34
Points
8
Age
54
Location
England
Excellent advise. Thanks for that Jim. I shall definitely start doing that myself. I've been trying to find a nice, clean, efficient system to keep track of my battles.

I've just completed a small battle at Joe's Bridge with a Marginal Success which I really enjoyed. It made a nice change to fight a quick, and dare I say relatively problem free battle. The Air Support was amazing and fantastically exciting to watch. I also seem to be getting the hang of Artillery a bit more now and it's great to be able to watch it come into play, all left to my subordinates as usual. I took screenshots of the battle and will be posting an AAR, if not tonight, then tomorrow.

Thanks for your advice. I appreciate it.

edit: I meant to say after I lost the use of my main laptop this morning and lost my save files I've turned on the in-game option to save the game every five minutes. I think it saves it to the steam cloud in my account? I may be wrong, but I've lost nothing by trying.
 
Joined
Oct 20, 2014
Messages
1,185
Points
63
Age
76
Location
Livonia, MI (Detroit-area suburb)
edit: I meant to say after I lost the use of my main laptop this morning and lost my save files I've turned on the in-game option to save the game every five minutes. I think it saves it to the steam cloud in my account? I may be wrong, but I've lost nothing by trying.

It gets saved in the Saved Games directory under your Steam install (on a PC "C:/Program Files (X86) /Steam/steamapps/common/Command Ops 2/Saved Games" using the nomenclacure Autosave X, where X is a number in sequence from 1-5. The sixth save overwrites the "1" file, so finding the correct save requires a combination of latest date and number.
 
Joined
Jun 5, 2022
Messages
34
Points
8
Age
54
Location
England
Continuation...

This is the situation now I'm back at it.

Z0 Situation upon continuation of battle.png

I really wanted to try to push on right through the centre of the map here and attempt to force the enemy south. I was also getting concerned about the build up of forces at Erezee so wanted to push some of my units towards that objective and see if I couldn't exert a little more control there too. I'd had a lot of reinforcements arrive recently, mostly Infantry, but some Paras too, so decided to make a big push of all the available reinforcements at once. This next shot shows them moving into their respective positions.

Z2 Trying to push the enemy further south.png
Reinforcements push South and East

Once daylight arrives, the battle begins in earnest and the Artillery is seen bombarding enemy units right in the thick of the battle for the centre. I've mentioned before about basically leaving the Artillery entirely to my subordinate commanders, and I'm always over-the-moon to see it spring into action, particularly when a good ol' fight is raging.

Z7 Artillery joins the battle.pngArtillery in action during the battle for the centre
At this point even more reinforcements arrive in the form of more Artillery, happily.

Z8 More reinforcements arrive.png
Hooray! More Artillery...
This seemed to be a good point to stop and reassess the situation. I'm pleased with how things are going so far. My forces seem to have the centre more or less under control but there's that big build up of the enemy to the East, and they have some strong units by the looks of things. My chaps have done well up until now but are getting tired and battle-worn. My first thought is to move some more units through to Erezee to join the Armoured Infantry that have already moved in there, then try to push south from there. It makes sense to me to reinforce there since I have a foothold already rather than trying to push through to the objective just East of Amonines.

Anyway, we shall find out whether that's a good idea or not soon enough.

Until next time then. Good luck and have fun.
 
Joined
Jun 5, 2022
Messages
34
Points
8
Age
54
Location
England
The final phase then, and I'm just planning to push over the river and attempt to take Erezee initially and then continue to push south on that side of the river to clear the enemy that's occupying the area east of Amonines.

Z10 Current situation at Erezee.png
Current situation at Erezee

Meanwhile, while my attention was distracted by the goings-on to the East we temporarily lose Soy. I'm not actually concerned by this at all though since the enemy doesn't have much of a presence here. I order a small attack on the enemy unit there to enable us to retake the objective.

Z11 We temporarily lose Soy.png
Temporarily lose Soy

Further South at Amonines, the Infantry takes a right ol' pounding from their Artillery. It won't be long before I throw all I can at this objective, more out of a sense of frustration that it just won't fall. It turned out to be an extremely hard fought battle there in the end. It seems the enemy really, really wanted to hold that position.

Z12 Our Infantry takes a pounding from their Artillery.png
Amonines. A really tough nut to crack!

I decide since time's very short now, I'm not likely to lose much by throwing everything and his brother into the fray. It didn't help. But I was making some slow progress by the time the battle ended. I'm pretty sure if I hadn't waited so long to attack there I'd have taken that objective soon enough.

Z14 I throw everything I have at Amonines.png
Attacking with everything at my disposal

We also lost Beffe at the last minute too. My attention had long been distracted from this area of the map what with all the battles going on in the East. This objective had been held by us for a good while and we only lost it towards the end. This always frustrates me, which is why I was trying my hardest to keep driving south in a bid to keep forcing the enemy further down the map and away from the various objectives, but as I say, I was distracted. Never mind.

Z16 Lost Beffe at the last minute.png
We lose the Beffe objective after holding it for quite some time

Z15 Draw.png
Draw screen

The Personnel casualties for the enemy were almost double ours, which was nice(eek...!). Also interesting to note we caused 305 personnel casualties via our various bombardments. These were all handled by my subordinates as usual so I'm pleased with that too.

The lessons from this battle I think mostly stem from lack of proper planning on my part. I'm going to be annotating the map with my plans probably at regular intervals in the next battle rather than just winging it and hoping for the best. We'll see if that helps things.

Anyway, hope you enjoyed my novice battle. I'm really enjoying documenting them. Have a good weekend everyone.

Until next time then...
 

Attachments

  • Z13 Amonines objective proves a tough nut to crack.png
    Z13 Amonines objective proves a tough nut to crack.png
    1.7 MB · Views: 1
Last edited:
Top