Welcome to the LnLP Forums and Resource Area

We have updated our forums to the latest version. If you had an account you should be able to log in and use it as before. If not please create an account and we look forward to having you as a member.

Situational Awareness Maps

Daz

Member
Joined
Oct 22, 2014
Messages
861
Points
43
Location
England
Situational Awareness Maps is the grandest title the boss could come up with to head this new thread, which is actually going to be a Blog, to chart the progress of my latest project.

A few weeks ago I received an email from Dave asking me if I would be interested in making some small maps to be inserted into the new scenario selection screen, within the new interface for Command Ops 2.
These maps will be designed to compliment the scenario descriptive text with an image of the tactical situation. A picture speaks a thousand words as they say.

To say I was surprised, and honoured that he had asked me to do them is an understatement!
I am a complete amateur at this kind of thing, having received no formal education in anything even related to it, but I guess he has been reading my AAR’s and other images that I have posted over the last few years related to this excellent game, and liked the way that I am (I hope you agree) improving as time goes on.

Anyway, the reason for this post is its very likely Command Ops 2 will be released with a place holder where the images of my maps will be, as I have not been able to spend much time on them yet, so I am going to keep a running Blog of my progress on making them, just like I have done in the past with my AAR’s.
The alternative is the release may be held up because of me and my little images, and I am sure you will all agree that you would rather be playing the new version of the game, than waiting for me to add fluff to the scenario selection screen!

What I am hoping is that the Blog will also help generate interest in the Scenarios as I progress, as well as keeping you informed of my progress on making them.
I would also appreciate any constructive feedback you might have along the way, and hope I can do them justice.
They will be added to the game to replace the place holder image, during the natural patching process of the game.

Chief Mini Scenario Operational Map Awareness Designer (Cool title I made up myself ;))
or as I like to be called CMSO-MAD (pronounced "Seems so mad"
Daz
 
Last edited:
Daz

Member
Joined
Oct 22, 2014
Messages
861
Points
43
Location
England
Dave later sent me an email with his specifications for the size of the of the image he wanted.
I have been used to working in my AAR's with images that are 1920 X 1080 which is the resolution of my own monitor, and when he told me the size he wanted them to be I was a little shocked a first, so I made a draft of what I thought the scenario selection screen would look like to try and get a grasp of how the whole thing will look.

What followed was a bit of haggling on the size, and we eventually settled on 640 x 480 as the size for my Operational Awareness Maps.
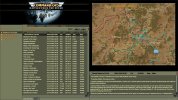
The image below is what I come up with.

He hadn't at that time started on the design of the Command Ops 2 Scenario selection screen, as far as I know, and I have not seen his version of it yet, so it will be very interesting to see what his version looks like.

THE FOLLOWING IMAGE IS NOT THE NEW COMMAND OPS SCENARIO SELECTION SCREEN, IT IS JUST MY DRAFT OF WHAT I THOUGHT IT MIGHT LOOK LIKE, BASED ON HIS EMAIL DESCRIPTION.
Layout_of_Scenario_Selection_Screen_1.jpg
 

Daz

Member
Joined
Oct 22, 2014
Messages
861
Points
43
Location
England
I was having a lot of trouble finding a clean base map on which to work from.
There are WW2 maps of the area in the Public Domain, but they all have existing operational graphics overlaid on them, and to clean them up would take a very long time, so my first draft of the Operational Awareness Map I submitted to Dave had maps from the game as the base on which I overlaid my operational graphics.

This we rejected as it was decided that it would be good to see a bit more of the surrounding area.
The image below is my first draft of the Tutorial Return to St Vith map, and how it would look inside my draft of the Scenario Selection Screen.

THE FOLLOWING IMAGE IS NOT THE NEW COMMAND OPS SCENARIO SELECTION SCREEN, IT IS JUST MY DRAFT OF WHAT I THOUGHT IT MIGHT LOOK LIKE, BASED ON DAVES EMAIL DESCRIPTION.
Example-UI-St-Vith.jpg
 

john connor

Member
Joined
Oct 22, 2014
Messages
2,488
Points
63
Age
60
Location
Brussels
Great stuff, Daz. Glad you're involved in this way. All those long nights sweating over photoshop, and now you get to use it in a public context, in the greatest computer wargame ever made. Great. Like the pic above. But what's an MSR? I see these things all the time, of course, and could look them up in two seconds, but would a key be needed for those who are new to it all (or as ignorant as I)? MSR. I would guess main supply route. MLR - main lego route? Or main line of resistance. But what's an XX, and an XXX, or a II and a I etc.....If there are to be a lot of the (excellent, immersive) military terms then a key perhaps? Or does that not work? Maybe it doesn't matter. As long as it looks hardcore, professional, proppa....yeah!

Peter
 

pekische

Member
Joined
Oct 23, 2014
Messages
107
Points
18
Location
Czech rep.
Daz, I am really happy that Dave have contacted you. I hope this could be only begin of further long cooperation. It would be great benefit for CO2. I wish you (us) great ideas in your effort. I am watching you... ;)
 

Iconoclast

Member
Joined
Oct 26, 2014
Messages
130
Points
18
Location
germany
I think the idea is brilliant, badly needed, and I think the project is in the best hands.

Just a few pointers, without driving to hard towards 100% accuracy. Just a few things to think about:

Since this is a tutorial played from the US point of view, they (or the player) are in the offense. A FEBA is a control measure not in the offense, but defense. What you might want to place there is a Line of Departure (LD). That could be more trickey when it is a scenario that can be equally played from both sides.

The representation of units could be a little confusing. One could think that there are two German Bns along the River and another complete Div at St. Vith. But the southern units are part of teh Div and the Div is not defnding St. Vith in force right? There are two options here:

1. The realistic road: Delete the Div. Since you are playing a Div yourselve, you would always map enemy units two levels below your level of command, e.g. Bns. That would result in the two Bns remaining, that they are part of 12th VG would be implied by the mission briefing and the enemy Div boundries that would be drawn on the map.

2. The "prettier" road, where you leave the Div graphic on the map (what I would suggest, for the sake of accesibility):Indicate that the two Bns are part of 12th VG by adding corresponding numbers to the right of the Bn graphics, as you did with the "1SS". e.g. XXX/12VGD. XXX being the Rgt number. Or leave away the Rgt-number and indicate with a "XX" over the 12 you skiped one level and the 12 refers to the Division.

The Attack Arrow is also a little odd. It indicates a main attack, though not in relation to the Corps 4th AD is part of. It is therefor irrelevant. On this map we see the Division, thus what we should see are the Attack corridors of the Combat Commands. That again doesen't make much sense since that is up to the player to decide.

1. We indicate the Obj, as it would be in real life. intermediate Obj included, though that would be also up to the DivCdr. Bt that way the player can see easily where the Obj are. No Arrows for the Division needed.

2. We show the other Combat Commands following up, putting the attack arrow in context again, making clear that CCA will make the mainthrust.

I don't expect you to change this beautiful piece of art though in any way. This is by far the best Map that I have seen so far in a video game, I just wanted to make a few remarks for those who are interested in knowing how this actually works in real life and read through this thread. Thats's all. I would be very delighted to see this in game.

I would like to suggest anyway, that I would highly welcome a few changes to the scenario discription. I always look for the very rough outlines of a scenario, but have trouble finding them in these more historical discriptions. The first lines of a discription should read something like:

Type: Allied Offensive Operation/ Meeting Engagement/etc...
Scale: Division/Corps/...
Complexity: medium/...
Time: 3d/...
Prefered as: Axis.

That is the kind of info I am looking for when choosing a scenario to play, but is currently too hard to read out of the scenario narratives.

If there are to be a lot of the (excellent, immersive) military terms then a key perhaps? Or does that not work? Maybe it doesn't matter. As long as it looks hardcore, professional, proppa....yeah!

There is a key for a lot of things in the current CO manual ;)

A
 
Last edited:

Rob

Member
Joined
Oct 22, 2014
Messages
155
Points
18
Location
Vancouver BC, Canada
"
Type: Allied Offensive Operation/ Meeting Engagement/etc...
Scale: Division/Corps/...
Complexity: medium/...
Time: 3d/...
Prefered as: Axis.
"

I agree 100% with your suggestion Iconoclast!

Rob.
 

Daz

Member
Joined
Oct 22, 2014
Messages
861
Points
43
Location
England
Thanks for the feedback guys, its very much appreciated :)

Peter:
I have already had to haggle with Dave to get an extra 100px for my images, I'm not going to be giving half of that up for a key lol
What I will do is re-post that key I did for the Market Garden AAR on here later, and ask Dave if he can include it into the pdf manual. What you can do then is print of the page and keep it on your desk until you learn them :D

Pekische: Thanks mate :)

Iconoclast:
Your feedback has been extremely helpful to me "A" thanks mate.
I did spend a little time in the SACC (Supporting Arms Coordination Centre) on board HMS Intrepid when I was serving many moons ago, but I spent most of my time in the field, and as we had the unenviable title of, Troops Prone to Capture, marking of the maps was frowned upon. Much of what I learnt in the SACC has been forgotten, or changed, so any help with the correct use of the tactical graphics is very much appreciated.

I am under a few self imposed constraints when it comes to the tactical graphics, for these Awareness Maps.
I have decided that I want to maintain an element of "fog of war".
Therefore I am only going to mark on the map what is described in the scenario description, that is available regardless of which side you choose to play.
I am also allowed to mark on the map the positions of the units you will be able to see when you first fire up the game as either side.
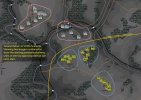
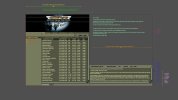
In the Tutorial Return to St Vith scenario, when you start the game playing as Axis, you will see the approximate positions of the enemy units, and their composition, see image below where I have combined two images together to show what the opposing side will see on start-up, into one image.
As you can see the Axis side is privy to the knowledge that they are facing approximately three Battalions of what appears to be Mechanized infantry in composition, and the Allies are facing approximately two Bn's of what appears to be primarily infantry in composition.
The Allies have no knowledge at this stage what Regiment they belong to, all they are aware of is that they are facing the 12th Volksgrenadier Division, as is mentioned in the scenario descriptive text.
Also mentioned in the descriptive text is that the Allies are on the offensive, and approaching St Vith with intention of capturing it, so I included the main axis of advance to indicate this intention, and to give the static image the feeling of some movement.

I think its important to maintain this fog of war in my images. What is your opinion on that?

Rob:
Thanks mate, I also agree with "A's" suggestion. :)
Tutorial-Return-to-St-Vith-StartingLoc.jpg
 
Last edited:

Daz

Member
Joined
Oct 22, 2014
Messages
861
Points
43
Location
England
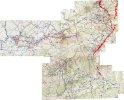
After the decision that we needed to zoom out a bit more, I set about sorting out, and acquiring the maps I would need, and stitched them all together to form an extremely large image of the entire area.
All these maps have existing operational graphics imprinted on them, so once that was done I set about finding the best way to remove the old graphics so that my new style graphics could be overlaid.

The below image is of the stitched together maps, at a low resolution as the file is extremely large.
All the maps have been released as Public Domain, meaning we can use them as we see fit, and as far as I know, were made by serving members of the US Army as part of their work to document the events of the Ardennes Battles, not long after the war.
I would like to think that they would have approved of their use like this, to teach people about the events, and keep alive the memories, and the sacrifice of those that died during this period of history.

One of the important things I have learnt about this battle is that the 2nd Battalion, 506th Parachute Infantry Regiment, (Band of Brothers) although they did an amazing job did not win the entire battle on their own, as the movie makers would have you believe, but there were in fact many other just as important, but less documented holding actions, by lesser known and prestigious units. Especially on the northern shoulder of the Bulge.
Ardennes-Tac-map-large-2.jpg
 

Daz

Member
Joined
Oct 22, 2014
Messages
861
Points
43
Location
England
My first attempt at removing the old graphics overlay was to vector trace the whole map, using Adobe Illustrator.
I first tried to use the auto trace feature with various options, but they all gave very unsatisfactory results so I set about hand tracing it.

Even though I got quite a lot done it soon became apparent that this was going to be an absolutely mammoth task, so I abandoned the idea.

The image below is a zoomed out image of the entire map, showing as far as I got with vector tracing it by hand, including the contour lines!
Vetor-trace-of-Ardennes-large.jpg
 

Daz

Member
Joined
Oct 22, 2014
Messages
861
Points
43
Location
England
This image is a zoomed in portion of the more finished right hand corner.
Maybe one day I will decide to finish it, but its too huge a task for this project I think.
Vetor-trace-of-Ardennes-small.jpg
 
Joined
Oct 24, 2014
Messages
83
Points
8
Age
68
Location
Groningen, NL
Website
springelkamp.nl
This kind of work would need pre-generated topographic data, from which you could generate your map.

That is how maps are generated today professionally, but I think there are open sources to enable you to do that.

But it would have an enormous learning curve in the beginning.

I bet 10 years from now all this is possible with easy to use software for amateurs.
 

Daz

Member
Joined
Oct 22, 2014
Messages
861
Points
43
Location
England
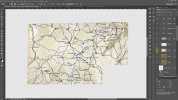
My next attempt, and current way of thinking is to clean each portion of the map individually, using photo re-touch methods from Photoshop.
This involves the use, primarily of the Clone Stamp tool, and the Paintbrush.
The Clone Stamp tool is used to replace the old graphic with the underlying terrain texture, then the features painted back in by hand with the paintbrush.
This method is still time consuming but lots faster than trying to hand trace the entire map.

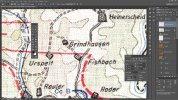
The following image shows the Clone Stamp tool in use.
Clone-Stamp-tool-in-use.jpg
 

Daz

Member
Joined
Oct 22, 2014
Messages
861
Points
43
Location
England
Thanks Erik. I'm looking forward to 10 years from now then :D

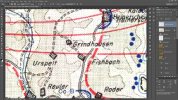
Same zoomed in image before partial cleaning.
Clone-Stamp-tool-before-use.jpg
 

Daz

Member
Joined
Oct 22, 2014
Messages
861
Points
43
Location
England
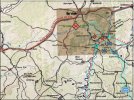
This is where I am at with my current version of the St Vith Scenario Operational Awareness Map.
Comments on this are especially welcome, particularly with regard to the correct use of the tactical overlay graphics.

_Tutorial Return to St Vith

January 5th, 1945 0600
Fictional scenario.
This tutorial scenario is intended to be played with Realistic Order Delay
If playing solitaire, then play as Allies.
If playing multiplayer, set the Axis reinforcement to Favour Axis. This will speed up the arrival of German reinforcements and make the scenario more balanced.
General Patton’s Third Army counteroffensive on the southern shoulder, begun on December 22, has gone well for the Americans. They have bypassed the German units concentrated around Bastogne, and moved north quickly. The 4th Armored Division is now approaching St. Vith, the last supply route to German troops still in the Bulge. Taking and holding St. Vith will achieve the Third Army objective of trapping those forces.
Since the German Panzer Divisions are all concentrated far to the west, the American armor is opposed only by a Volksgrenadier Division - but it’s the 12th VGD, considered one of the best German infantry divisions on the Western Front.
Start: 05 Jan 1945 06:00
End: 09 Jan 1945 06:00
Duration: 04:00:01
_Tutorial_Return_to_StVith_640X480-1.jpg
 
Last edited:

Daz

Member
Joined
Oct 22, 2014
Messages
861
Points
43
Location
England
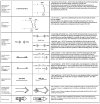
I have been doing some research to try and determine the correct use to the Operational Graphics.

This is quite a unique situation, that I have on my hands here, as it would never happen in a real example.
The reason being that I am not actually one of the belligerents, but an observer, plotting on the map what little information I know about either side. So neither side is actually mine to be able to insert things like phase lines.
Theoretically (to maintain an element of Fog of War) I don't know the exact positions of either side, and neither side is friendly or hostile although I will continue the use of Allies as a hue of blue (friendly), and Axis as hue of red.

I think that the line of contact (hostile and friendly FLOT back to back), is a valid use of this particular graphic, in these unique circumstances, to indicate a rough guide as to the zones of control for the two sides, where you may expect to find concealed units of the indicated side. Possibly screening or Reconnaissance forces.

Also the two control graphics to indicate the FEBA where there is actual current contact between the spotted opposing units.

I also know from the scenario description, that the 4th Armoured Div is on the move, (as indicated on my map by the convoy arrow) coming from a southerly direction, and that they intend to continue to push north with an axis of attack towards St Vith.
Planning-Graphics-Key-2.jpg
 

Daz

Member
Joined
Oct 22, 2014
Messages
861
Points
43
Location
England
Ok time to move onto the next scenario now:

Advance to the Sure
Type: Allies Counter-attack/Axis Delaying Operation
Scale: Corps
Complexity: medium (Could do with some help to determine this, as its quite subjective. Anyone that feels it should be anything other than medium please speak up)
Duration: 06:04:01 (DD,HH,MM)
Preferred as: Allies


December 22nd 1944, 14:00 hours, Luxembourg
Historical scenario.
7. Armee: LXXXV Armee Korps sector - Southern Shoulder.

In response to Eisenhower’s command on December 19th for a counteroffensive toward Bastogne by 3rd Army, Bradley and Patton agreed to move the inexperienced and untried III Corps headquarters north from Metz to Arlon in Luxembourg, attaching 3 divisions from rear areas behind the 3rd Army front.
These 3 divisions (4th Armored, 26th, and 80th Infantry Divisions) were to launch a counterattack along a 30 mile front from Ettelbruck to Neufchâteau. The 4th Armored Division on the left wing was to advance north to Bastogne through rolling hills and pastureland cut by an occasional creek or stream. However the axis of advance for the 26th Infantry Division in the center and 80th Infantry Division on the right traversed through some of the most treacherous terrain found anywhere in the Ardennes. These 2 divisions were to advance to the Sure River and secure crossing sites before pushing on toward Wiltz and relieve some of the pressure on the defenders in Bastogne.
On an operational scale, December 22nd marked the end of the defensive battles for the US soldiers fighting the German 7th Army along the Southern shoulder of the Bulge. Feeling certain that the Germans were unaware of the imminent threat to their southern flank, Patton told the commander of III Corps, Maj. Gen. John Millikin to "Drive like hell".
The Historical reinforcement schedules for both sides reflect the historical arrival times and locations of units in the battle. Standard reinforcement schedules provide alternative entry locations for some units without favouring one side or the other. The Favour Allies and Favour Axis settings provide alternatives favouring one side or the other.
Start: 22 Dec 1944 14:00
End: 28 Dec 1944 18:00

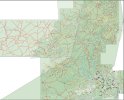
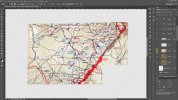
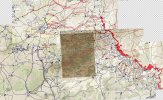
I have quite a bit of map cleaning to do now as you can see in the image below so might be a few days before I post another update.
Advance-to-the-Sure-map-dirty.jpg
 
Last edited:
Top